


User’s Manual for InterForm400® 95
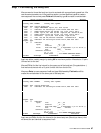
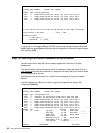
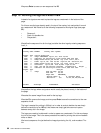
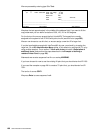
line 11) ends 5,068 from the top. We add 42 pels to 5,068 and get 5,110.
We state the same values for left and right edge as the black frame, and define the
thicknes of our frame to be 1/6" (40/240") by adding 40 to the top edge.
We do not want a border only a raster filling, and therefore we leave this blank. But we will
have a light shading and we enter the value B which is a light 600dpi pattern.
For the repeated frames we must first state the distance from the top of the first frame to
the top of the next frame. We want to place a frame behind every second item line and as
the frame is 1/6” (40 pels) thick in the vertical direction and we want 1/6” inch between the
frames, we must add these two values. This gives us 40+40 = 80 pels.
We want 6 frames total which means we should repeat the frame 5 extra times.
We press Enter to save our new sequence line 19.
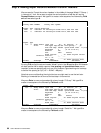
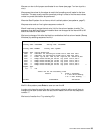
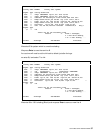
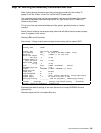
Step 12. Defining the 5 Item Coloumn Frames
We now want to define some frames to divide the item lines columns in the spool entry:
We want to place the definition just after the previous definition of the raster frames, and
we enter 19,1 for inserting an overlay element before sequence line 20:
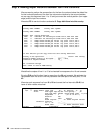
Design InterForm 400 overlay APF300D
Overlay name: MYDEMO Overlay text: Mydemo
Seqnbr. Type Overlay definition
0017 9 Remap window 28-028 pos 54-070 top 5,060 left 6,000 C
0018 7 Ink Foreground = BLACK Background = UNALTERED
0019 1 Frame top 05,110 left 01,120 right 06,116 bottom 05,150
0020 9 Remap window 30-042 pos 08-014 top 5,100 left 2,000 C
0021 9 Remap window 30-042 pos 15-025 top 5,100 left 3,000 C
0022 9 Remap window 30-042 pos 26-039 top 5,100 left 4,000 C
0023 9 Remap window 30-042 pos 40-053 top 5,100 left 5,000 C
0024 9 Remap window 30-042 pos 54-070 top 5,100 left 6,000 C
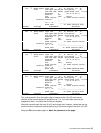
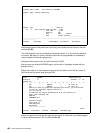
Seqnbr. Type Inch.pel Repetition
19,1 1 Frame Top edge 05,072 Move right ______1
Left edge 01,120 Move down _______
Right edge 02,116 Extra times __4
Bottom edge 07,120
Thikness in pels 001 NW NE SW SE
Round/Sharp (R S) S Radius __ __ __ __
Fill pattern _ F4=List
F3=Exit F18=DSPSPLF F12=Cancel
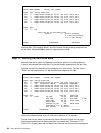
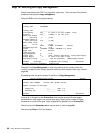
The line should start just below the black frame defined in sequence line 11.
We add 4 pels to the bottom of the black frame and we get 5,072 for the top of the item
line frame.
We set the left edge equal to the black frame (1,120) and we set the right edge 1 inch
higher minus a few pels (1,120-0,004=1,116). This will give a small space between each
column frame.
We measure the bottom edge to be around 7½” (7,120).
As we have precisely 1 inch between each column we can move right 1 inch and repeat 4
times to get 5 identical columns.