


User’s Manual for InterForm400® 105
Step 18. The Result
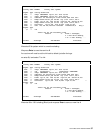
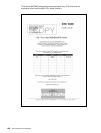
Now we print the overlay merged with the spool entry using 3. Merge Spool entry with
overlay.
If your printout looks like the illustration on the next page, and you understood what went
on, you can consider yourself quite familiar with InterForm400
®
.
We have brought you through the heaviest kind of design you will experience with
InterForm400
®
.
A vital feature of the system which we did not use, is import of PCL files made in graphical
applications (e.g. Windows). The actual insertion of the PCL file is so simple that we
decided to leave it out from this example. (more info on PCL files on page 70 and 325)
You will probably realize that even if you create your complete overlay in Word,
PageMaker, JetForm or another graphical tool and import it into your overlay definition,
you will have to make some formatting within InterForm400
®
regarding copies, re-
mapping, conditional selections etc.
With this section our intention was to show you the potential of InterForm400
®
as a Forms
Management System and we haven't even talked about the Auto Forms Control features
yet. A similar example on Auto Forms Control features are made on page 155)
L TROUBLE SHOOTING L
Not the result as the following example?
Q Did you use a PCL5 compatible printer?
Q Are you sure all your entries was correct?.
A Try locating the overlay elements which went wrong and check the corresponding
overlay definition.
L TROUBLE SHOOTING L
Everything looks fine but the horizontal bars are missing?
Q Did you use a HP4 or HP4D printer type?
A Your printer might not be fully supporting 600 dpi which is used for the patterns in this
example. Some printers emulate 600 dpi by printing 300 x 600 dpi. You should then
either change the pattern according to a pattern printout on your printer (see page ?), or
change the printer type using in InterForm400
®
to HPIII or HPIIID.