


User’s Manual for InterForm400® 367
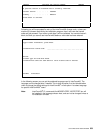
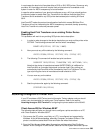
STRPRTWTR DEV(PRTXXX)
8. Note that if Auto Configuration is enabled on the AS/400 the protocol
converter might change the device description back to 5219 the next time it
is powered ON. Disable auto configuration to prevent this problem:
CHGSYSVAL SYSVAL(QAUTOCFG) VALUE(‘0')
Changing Device Description from 5219 to 3812
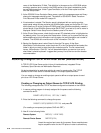
In order to change a device description it is necessary to delete the device description for
the Twinax attached printer emulating 5219, and create a new description for a 3812
model 1. In the following we assume the name of the device to be PRTXXX.
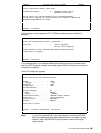
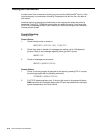
1. First you must determine the controller number, the port number and the
device address of the existing 5219 device. The following CL command will
display the existing device description:
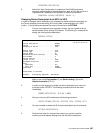
DSPDEVD PRTXXX
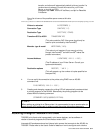
Display Device Description INTER01
16.01.01 09.27.57
Device description . . . . . . . . : PRTXXX
Option . . . . . . . . . . . . . . : *BASIC
Category of device . . . . . . . . : *PRT
Device Class . . . . . . . . . . . : *LCL
Device type . . . . . . . . . . . : 5219
Device model . . . . . . . . . . . : D2
Advanced function printing . . . . : *NO
Port number . . . . . . . . . . . : 2
Switch setting . . . . . . . . . . : 3
Online at IPL . . . . . . . . . . : *YES
Attached controller . . . . . . . : CTL01
Font:
Identifier . . . . . . . . . . . : 011
Point size . . . . . . . . . . . : *NONE
Form feed . . . . . . . . . . . . : *AUTOCUT
Press Enter to continue
F3=Exit F11=Display keywords F12=Cancel
Make a note of the Port Number (2), the Switch setting (3) and the
Attached controller (CTL01).
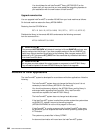
2. In order to make changes or delete the device description you must end
the printer writer PRTXXX. The following command will end the writer
immediately:
ENDWTR WTR(PRTXXX) OPTION(*IMMED)
3. Now you must vary off the device by the following command:
VRYCFG CFGOBJ(PRTXXX) CFGTYPE(*DEV) STATUS(*OFF)
4. You are now able to delete the 5219 device description by this command:
DLTDEVD DEVD(PRTXXX)
5. Continue from step 5 in the previous section, but use the controller
number, port and address settings from the old device description: