


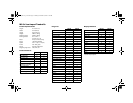


M9.3xi Low-Impact Treadmills Assembly Guide 6
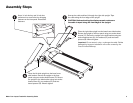
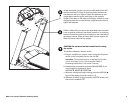
Replace the lower handrail clamp and secure the handrails to the clamp
using two socket head screws (E) and two washers (F).
Replace the four lower handrail clamp fasteners removed in step 8. To
reduce gaps between the upper and lower portions, squeeze the clamp
together while you wrench tighten all six fasteners.
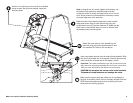
Tighten the following mounting screws.
a. Wrench tighten the two upper handrail side screws. Refer to step 9.
b. Wrench tighten the four side rail screws at the base of the handrails.
Refer to step 10.
Check the alignment and adjust the running belt. For instructions, refer to
Checking the Alignment and Adjusting the Running Belt.
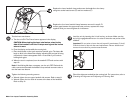
Test the heart rate feature.
a. Turn the unit ON. The Precor banner appears in the display.
CAUTION: When testing the heart rate feature, stand to the
side of the treadmill until the lift stops moving and the incline
returns to zero.
b. Face the display and straddle the running belt.
c. Place both hands on the touch-sensitive handrail grips. The letters Hr
begin to blink in the Heart Rate display indicating that a signal is being
transmitted. A heart rate appears within 15 seconds if you continue
holding both grips.
d. When the test is completed, turn the treadmill OFF and continue with
step 16.
Note: If the blinking Hr does not appear, turn the unit OFF. Recheck the
cable connections beneath the handrail clamp and ask someone else to
test the heart rate feature.
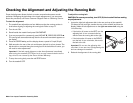
Level the unit by inserting the ¼-inch hex key, as shown. Make sure the
key is fully engaged and then turn it to raise or lower the rear portion of the
treadmill.
Important: Do not raise or lower the unit beyond 2 centimeters (¾ inch).
Check the level of the unit after each adjustment. Place a bubble level
across the rear deck for precise measurements.