


M9.3xi Low-Impact Treadmills Assembly Guide 5
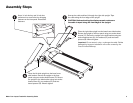
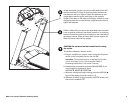
Use the ¼-inch hex key to remove the four handrail
clamp screws. Set the lower handrail clamp and
fasteners aside.
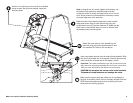
Slide the ends of the handrails toward the center handrail
clamp and secure them to each side bracket using two
socket head screws (C) and two washers (F). Make sure the
black foam on the handrail does not cover or interfere with
the handrail clamp mounting holes.
Attach the lower portion of the handrails to the
side rails using four socket head screws (C) and
four washers (D). Refer to the note above.
Note: In steps 9 and 10, wrench tighten each fastener until
the head is flush against the assembled part and then
reverse the motion to loosen the fasteners by one or two full
turns. Some movement in the handrails is necessary to allow
for proper alignment of the assembly.
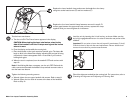
Heart rate cables protrude from the ends of both handrails. Slide
the end of each cable into its receptacle. Carefully place excess
cable inside the recessed area in the display console.
Important: The cable receptacles mirror the connectors so that
they cannot be improperly installed. Do not force a connection!
Take your time and look for the tabs on the connectors.
CAUTION: Do not place the excess cable in the handrails.
The handrail clamp fasteners can damage the cable.
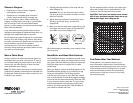
Make sure the excess heart rate cables are not impeding the
function of the safety switch. Pull on the safety lanyard. If the red
STOP button depresses and you hear a clicking sound, the
safety switch is working properly.