


Removal and Installation Procedures
TAS 455 and TAS 465 Service Manual
6Ć19
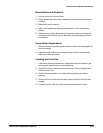
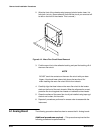
Menu Buttons and Elastomer
1. Lay the front trim on a flat surface.
2. Gently remove the menu button elastomer. Avoid touching the electrical
contacts.
3. Remove the menu button(s).
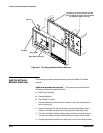
4. Install menu buttons by placing a menu button in each menu button
location.
5. Place the menu button elastomer over the menu buttons, ensuring that
all standoffs protrude through the elastomer. Avoid touching the electriĆ
cal contacts.
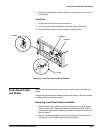
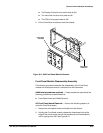
Power Button Replacement
1. With the front trim removed, grasp the power button and pull straight out
from the chassis.
2. Install the power button by pushing the button onto the power button
shaft until it locks into place.
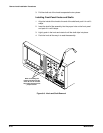
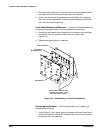
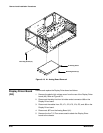
Installing the Front Trim
1. If the menu buttons were removed, insert each button to its hole in the
trim ring and install the menu button elastomer.
2. Align the front trim to the front of the instrument, without engaging any
of the four flex locks.
3. Position the power button in line with the frontĆpanel power button
opening.
4. Slide the front trim onto the instrument, ensuring that all four flex locks
engage.
5. If installing a new front trim, apply the appropriate front trim label.