


Brief Performance Checks
TAS 455 and TAS 465 Service Manual
4Ć7
4. Verify that the main time base is operational, confirming the following
statements are true.
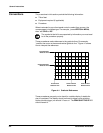
H One period of the square wave is about five horizontal divisions.
H Rotate the SEC/DIV control clockwise and verify that the waveform
expands (more horizontal divisions per period of waveform) and that
counterclockwise rotation contracts it.
H Set the sec/div scale to 1 ms and verify that approximately one
period of waveform per horizontal division is displayed.
H Rotate the horizontal POSITION control and verify that the waveform
moves left and right onĆscreen.
H Pressing the MAG button changes the sec/div scale from 1 ms to
100 ms and one period of the square wave is about ten horizontal
divisions. Return to a nonĆmagnified display by pressing the MAG
button again.
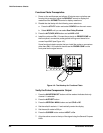
5. Press the HORIZONTAL MENU button and set DELAY to On.
6. Set the delayed sec/div scale to 500 ms.
7. Press the TRIGGER MENU button and set MODE to Runs After.
8. Press the HORIZONTAL MENU button.
9. Select TRCSEP from the main menu and vertically position the delayed
time base below the main time base using the General Purpose Knob.
10. Select DELAY from the main menu.
11. Verify that the delayed time base is operational, confirming the following
statements are true:
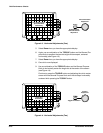
H The main sweep has an intensified zone of approximately 5.5 horiĆ
zontal divisions. Adjust the INTENSITY level if necessary to view the
entire intensified zone.
H Rotating the General Purpose Knob clockwise moves the intensified
zone to the right onĆscreen. Position the intensified portion to the
center of the screen.
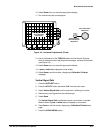
12. Adjust the delayed sec/div scale to 200 ms.
13. Set MAIN to Off and confirm that only the delayed sec/div scale is
displayed and the period of the squareĆwave signal is about five horizonĆ
tal divisions.
14. Set MAIN to On and DELAY to Off.
Verify the Trigger System
1. Press the WAVEFORM OFF button until the readout indicates channel 1
is the only selected channel.
2. Press the AUTOSET button.