


Service Manual Functional verification 29
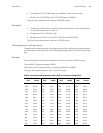
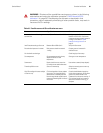
“Expansion module option configurations” on page 8. The following table shows how to
identify compatible sensors for each Nellcor option:
Printer tests
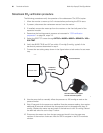
The following steps check the functionality of the printer.
1. Disconnect all cables from the monitor.
2. Turn the monitor OFF then ON.
3. Press SETUP > WAVE SELECT > INSERVICE.
4. Press HOME .
5. Wait at least 8 seconds and then press the printer's SNAPSHOT key.
6. Check that the printer prints an approximately eight-inch strip of the simulated patient
data. The paper should stop only after the entire waveform has been fed out of the
printer.
7. Press the printer's START/STOP key. The printer should begin continuous printing.
8. Press the START/STOP key to stop printing.
9. Lay the monitor on its back.
10. Press the START/STOP key to start printing.
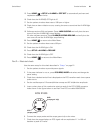
11. Completely open the paper door on the bottom of the Expansion Module.
12. Check that the printer stops printing, and that an equipment alarm and CHECK DOOR
message appear on the monitor screen.
13. Cut or tear the printer paper in the printer mechanism from the roll, leaving the strip of
paper in the printer mechanism.
14. Completely close the paper door.
15. Press the START/STOP key.
16. After the printer runs out of paper, check that an equipment alarm and PAPER OUT
message appear on the monitor screen.
17. Open the printer door and reload the paper into the printer.
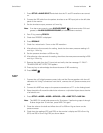
Table 7. Sensor compatibility
Sensor Description Connector Compatible with
Pins Notches Color MP-203 MP-405 Nell-2, MP-507
Single-ended 7 0 Varies Yes No No
Differential 7 1 Varies Yes Yes No
OxiMax 9 2 Purple Yes Yes Yes
OxiMax-Exclusive 8 2 White No No Yes
Note
Functional verification should be performed on the monitor before beginning the
printer tests. The monitor must be functioning properly to perform printer tests.