


GB
10
4.1. CLEANING AND
INSPECTING THE RUNNING BELT
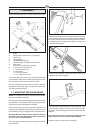
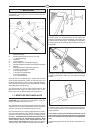
Turn the unit off and unplug the electrical cord from the wall
outlet and from the treadmill. Carefully turn the treadmill on
its side. Wipe off the inside of the running belt using a harsh
brush. Do not use solvents. Rotate the running belt carefully
by hand to clean the entire inside face. Loosen the belt
adjusting screws at the back of the treadmill, if necessary.
Return the treadmill into the upright position.
If running belt edges are frayed, check the running belt
alignment. If seams are splitting contact your local
TUNTURI representative.
4.2. CLEANING THE TREADMILL
Wipe the treadmill surfaces, especially the handlebars and
meter from dust with a damp cloth or towel. Do not use
solvents.
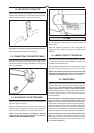
Use a small vacuum nozzle to carefully vacuum around all
visible components (belt, running deck, side rails etc.). By
supporting the device on one of the side rails you can also
vacuum it from below. Vacuum also from inside the motor
hood.
Clean the rollers once a year as follows: Loosen the adjusting
bolts and wipe the rollers with a harsh brush. Tighten the
tension adjustment bolts. Check that the running belt is
aligned and centered on the treadmill bed (see 3.1.
ALIGNING THE RUNNING BELT and 3.2. ADJUSTING THE
BELT TENSION).
4.3. LUBRICATING
THE RUNNING DECK
Lubrication is the most important service activity for the
treadmill. This is absolutely essential, if the friction of the
running deck increases noticeably or the motor begins to
heat up. Lubrication intervals must under no circumstances
exceed 200 usage kilometres; we recommend relubrication
once a month. During the first 200 km of use, the running
deck must be lubricated at intervals of 50 km. Insufficient
lubrication will cause the belt, running deck and motor to
wear out and break.
NOTE! Before you start to use your treadmill, it must be
carefully lubricated per the lubrication instructions
below! NOTE! If the treadmill is not used for at least
three weeks, it must be carefully lubricated per the
lubrication instructions below!
The need for relubrication depends to a great extent on the
running styles and weight of the user: heavy user weight and
slow speed put particular strain on the device and therefore
demand greater lubrication. Use only the teflon enclosed to
lubricate the treadmill. Contact your local TUNTURI dealer
for further supplies of teflon.
NOTE! The device must under no circumstances be
lubricated with silicone!
Please apply teflon by using the pressurised can provided
with these instructions. Follow these and the safety
instructions on the teflon bottle carefully.
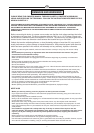
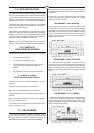
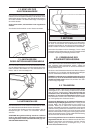
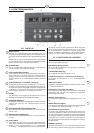
1. Let the treadmill run at a slow speed and spray
teflon into the lubrication pipe underneath the
treadmill. The pipe is marked with a decal.
2. When teflon is applied for the first time, the
spraying time with the pressurised can should be
approximately 20 seconds. Later, a spraying time of
10 seconds is sufficient.
3. Teflon drops through the holes of the lubrication
pipe to the center of the running belt; the treadmill
is instantly ready for use.
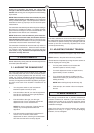
Please ensure after each time that you relubricate your
treadmill that a strip of about 8" wide on the underside of the
running belt becomes moist with teflon oil along its whole
length. If necessary, spray teflon directly to the underside of
the running belt.
4.4. ERROR CODES
In case of certain faults relating to the electronics of the
treadmill, it has an integral, internal fault-finding system in
order that faults can be found and corrected as quickly as
possible.
The fault-finding system obviously does not cover all
possible faults, but it does help to identify the most likely
faults resulting from long-term use. When such a fault
occurs, the display shows one of the fault codes below:
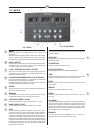
CODE DESCRIPTION
E 1 Failure of speed sensor (sensor does not
react to any movement of the belt)
E 4 Lift sensor or elevation system failure
E 7 Software failure
E 8 Speed of the running belt exceeds set
speed
If any error code appears on the display or there are other
malfunctions, proceed as follows:
1. Turn off the power switch for a minute and then
turn it on again.