


Autotransformer Replacement
The autotransformer may be tapped to accommodate line voltages from 195VAC to
250VAC. Following are procedures for replacing a failed autotransformer.
Tools:
• Replacement autotransformer
• Philips-head screwdriver
• Slot screwdriver
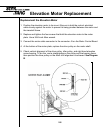
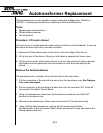
Procedure: Lift motor shroud
The drive motor is located below the plastic shroud at the front of the treadmill. To remove
the shroud at access the motor, proceed as follows:
1. Remove the Philips-head screw at the center of the front edge of the shroud.
2. Lift up the front of the shroud, lifting from both sides to separate the Velcro strips.
3. Lift the shroud up the vertical rails as far as it can go, then suspend it using a bungee
cord looped over the gooseneck rail and hooked up under the upper edge of the
shroud.
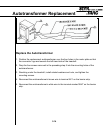
Remove the Autotransformer
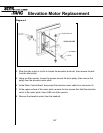
The autotransformer is located on the left-hand side of the motor plate.
1. Pull the connectors of the red and blue wires from the transformer lugs. See Diagram
A for wire color layout.
2. Pull the connector of the transformer’s black wire from the connector AC1 at the left –
rear corner of the Motor Control Board.
3. Using a slot screwdriver, disconnect the transformer’s white wire from the WHT
terminal on the barrier strip.
4. Disconnect the transformer’s brown wire from terminal AC1on the barrier strip.
5. Using a Philips-head screwdriver, remove the four screws that hold the
autotransformer to the motor plate. Reach under the treadmill to hold and retrieve the
related washers and nuts.
5.13