


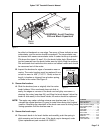
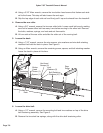

12. Attach the drive belt tensioning assembly.
A. Place the drive belt tensioning roller in position under the front bracket on the drive
belt tensioning assembly. See Figure 3.
B. Place the two steel bar springs over the drive belt tensioning roller plate and under the
front bracket on the drive belt tensioning assembly. Be sure springs are firmly seated
against the stop under the drive belt retainer.
C. Be sure that the pulley is aligned with the drive belt.
D. Using a 1/2” wrench, tighten the mounting bolt and two washers while keeping the
pulley aligned with the drive belt. NOTE: A drive belt that is too loose may squeal and
you may be able to see it slip when you walk on the running belt.
13. Attach the running deck.
A. Using an Allen wrench, attach the remaining screw, spacer, and belt retaining washer
in the frontmost right hole.
B. Using a 7/16” wrench, attach the nine screws, nine washers and nine belt retaining
washers that hold the deck in place. See Figure 3.
Rear Roller
14. Replace the rear roller.
A. Slide the rear roller into the running belt.
B. Place the bolts, washers, springs, and nuts in position. Partially tighten the two bolts
leaving them loose until step 15C.
15. Reinstall the side rails and end caps.
A. Line up the side rails with the end of the frame. Place the bottom edge of each side
rail under the treadmill frame and push the top edge of each side rail in place. It will
snap on.
B. Place the end cap flush with the end of the side rail and the end of the frame. Use a
3/16” Allen wrench to attach the two button head screws that fasten each end cap
and side rail to the frame.
C. Using a 3/4” wrench, tighten each rear roller bolt evenly, making sure not to loosen
either bolt too many turns before moving to the other bolt. use the small plastic tab
above the bolt hole as a visual reference to tension the rear roller bolts. When
tightening the rear roller bolts, look down onto the plastic tab located just above the
bolt head. Make sure the entire side of the silver washer is visible and is not hidden by
any portion of the tab.
16. Adjust the running belt tension and center the belt by following the instructions
Cybex 710T Treadmill Owner’s Manual
Page 7-10