


10 mph (16 kph) with no load should not go below 168 VDC. If it is below
83/168 VDC respectively, the magnets are weak and the drive motor
should be replaced. Press STOP to end the test.
7. Secure the front panel.
A. Using a 3/16” Allen wrench, secure the front panel to the frame with the
four button head screws and four starwashers.
8. Secure the side rails and motor cover.
A. Snap the side rails back down into their original position.
B. Using a 3/16” Allen wrench, attach the end caps onto the sides of each
side rail with two button head screws.
C. Lower the motor cover in place and attach it with the two Phillips screws.
Running Belt & Deck
After a deck has been rotated, flipped, and rotated again, the useful life of the
deck has been met. Have a qualified Cybex service technician replace your old
deck with a new one.
NOTE: This procedure will cover the running deck, running belt, front roller, rear
roller and drive belt.
Tools Required
• Phillips head screwdriver
• 7/16" wrench
• 1/2" wrench
• 3/4" wrench
• 3/16" Allen wrench
1. Turn the power off.
A. Turn the main power switch in the front panel to the off (O) position. (It
is labeled I/O).
B. Unplug the treadmill from the power outlet.
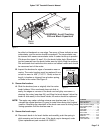
2. Remove the motor cover.
A. Using a Phillips head screwdriver, remove the two screws that fasten
the motor cover to the frame.
B. Lift the motor cover and remove it from the treadmill.
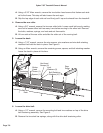
3. Remove the side rails.
Cybex 710T Treadmill Owner’s Manual
Page 7-7
Control During Operation . . 3-4
Data Readouts. . . . . . . . . . . 3-5
Selecting Programs
& Options . . . . . . . . . . . . . 3-6
Displaying Heart Rate . . . . . 3-6
Use of Programs . . . . . . . . . 3-7
Manual Mode . . . . . . . . . . . 3-8
P1 - Fitness Test Program. . 3-8
P2 - Weight Loss Program 3-10
P3 - Cardiovascular Program 3-12
P4 - Speed Challenge
Program . . . . . . . . . . . . . 3-14
P5 - Express Program. . . . 3-16
P6 - Hill Interval Program . 3-17
P7 - Speed Interval
Program . . . . . . . . . . . . . 3-18
P8 - Pike’s Peak Program . 3-19
P9 - River Run Program . . 3-20
P10 - 5 Kilometer Program 3-21
P11 - Demonstration
Program . . . . . . . . . . . . . 3-22
P101-P110 - Saved
Program . . . . . . . . . . . . . 3-22
Workout Tips. . . . . . . . . . . 3-24
4
Preventive Maintenance
Regular Maintenance
Activities. . . . . . . . . . . . . . 4-1
Cleaning Your Treadmill. . . . 4-1
Running Belt Maintenance . 4-2
Other Preventive
Maintenance . . . . . . . . . . . 4-6
Service Schedule . . . . . . . . . 4-7
Log Sheet. . . . . . . . . . . . . . . 4-8
5 Setup & Assembly
Quick Setup . . . . . . . . . . . . 5-1
Choosing & Preparing a Site 5-1
Electrical Power
Requirements. . . . . . . . . . 5-3
Unpacking. . . . . . . . . . . . . . 5-3
Assembling the Treadmill. . . 5-4
Testing the 710T Operation. 5-9
Setting Operation Options. 5-10
6 Customer Service
Contacting Service . . . . . . . 6-1
Serial Number & Voltage . . . 6-1
Warranty . . . . . . . . . . . . . . . 6-1
Return Material Authorization . .
(RMA) . . . . . . . . . . . . . . . . 6-4
Damaged Parts . . . . . . . . . . 6-4
Ordering Parts. . . . . . . . . . . 6-5
7 Service
Service Instruction . . . . . . . . 7-1
Motor Brushes. . . . . . . . . . . 7-1
Motor Current & Voltage . . . 7-4
Running Belt & Deck . . . . . . 7-7
Drive Belt. . . . . . . . . . . . . . . 7-9
Front Roller . . . . . . . . . . . . . 7-9
Rear Roller . . . . . . . . . . . . 7-10|
Error Codes. . . . . . . . . . . . 7-11
Diagnostic Tests . . . . . . . . 7-13
Parts List . . . . . . . . . . . . . . 7-20
Exploded View . . . . . . . . . . 7-23
710T Schematic . . . . . . . . . 7-24