


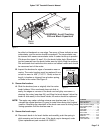
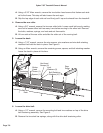

7. Remove the front roller.
A. Using a 1/2” wrench, remove the two screws and four washers that
fasten the front roller to the front end assembly.
B. Lift and slide the front roller out of the drive belt and running belt.
8. Remove the running deck and running belt.
A. If you are rotating or flipping the deck make a note on the deck so you
know which way it was positioned. This way, you can be sure to use all
four deck positions before replacing the deck. Make the note near the
edge of the deck where the bolts are so that the note will not be worn
off by belt contact.
B. Lift one side of the deck and slide it out of the running belt. The running
belt is now free to remove from the treadmill.
! CAUTION: Cybex recommends using only Cybex running belts because
we cannot guarantee the performance of other brands.
9. Position the running belt and running deck.
A. Place the running belt in position around the deck.
B. Place the deck in position without the hardware at this time.
Drive Belt
10. Position the drive belt.
A. If you are changing the drive belt you can slip the old belt around the fly
wheel and off the treadmill. Slide the new drive belt around the flywheel
and on to the drive pulley. Slide the front roller into the running belt. Be
sure the drive belt is around the drive pulley and the front roller before
attaching the front roller. There will be some slack in the drive belt until
step 12D is complete.
Front Roller
11. Attach the front roller.
A. With the drive belt around the drive pulley and the front roller, loosely
attach the two screws and four washers that fasten the front roller to
the front end assembly. Tighten each of the two screws evenly. Make
sure not to tighten one bolt too many turns before moving to the other
bolt.
Cybex 710T Treadmill Owner’s Manual
Page 7-9
Control During Operation . . 3-4
Data Readouts. . . . . . . . . . . 3-5
Selecting Programs
& Options . . . . . . . . . . . . . 3-6
Displaying Heart Rate . . . . . 3-6
Use of Programs . . . . . . . . . 3-7
Manual Mode . . . . . . . . . . . 3-8
P1 - Fitness Test Program. . 3-8
P2 - Weight Loss Program 3-10
P3 - Cardiovascular Program 3-12
P4 - Speed Challenge
Program . . . . . . . . . . . . . 3-14
P5 - Express Program. . . . 3-16
P6 - Hill Interval Program . 3-17
P7 - Speed Interval
Program . . . . . . . . . . . . . 3-18
P8 - Pike’s Peak Program . 3-19
P9 - River Run Program . . 3-20
P10 - 5 Kilometer Program 3-21
P11 - Demonstration
Program . . . . . . . . . . . . . 3-22
P101-P110 - Saved
Program . . . . . . . . . . . . . 3-22
Workout Tips. . . . . . . . . . . 3-24
4
Preventive Maintenance
Regular Maintenance
Activities. . . . . . . . . . . . . . 4-1
Cleaning Your Treadmill. . . . 4-1
Running Belt Maintenance . 4-2
Other Preventive
Maintenance . . . . . . . . . . . 4-6
Service Schedule . . . . . . . . . 4-7
Log Sheet. . . . . . . . . . . . . . . 4-8
5 Setup & Assembly
Quick Setup . . . . . . . . . . . . 5-1
Choosing & Preparing a Site 5-1
Electrical Power
Requirements. . . . . . . . . . 5-3
Unpacking. . . . . . . . . . . . . . 5-3
Assembling the Treadmill. . . 5-4
Testing the 710T Operation. 5-9
Setting Operation Options. 5-10
6 Customer Service
Contacting Service . . . . . . . 6-1
Serial Number & Voltage . . . 6-1
Warranty . . . . . . . . . . . . . . . 6-1
Return Material Authorization . .
(RMA) . . . . . . . . . . . . . . . . 6-4
Damaged Parts . . . . . . . . . . 6-4
Ordering Parts. . . . . . . . . . . 6-5
7 Service
Service Instruction . . . . . . . . 7-1
Motor Brushes. . . . . . . . . . . 7-1
Motor Current & Voltage . . . 7-4
Running Belt & Deck . . . . . . 7-7
Drive Belt. . . . . . . . . . . . . . . 7-9
Front Roller . . . . . . . . . . . . . 7-9
Rear Roller . . . . . . . . . . . . 7-10|
Error Codes. . . . . . . . . . . . 7-11
Diagnostic Tests . . . . . . . . 7-13
Parts List . . . . . . . . . . . . . . 7-20
Exploded View . . . . . . . . . . 7-23
710T Schematic . . . . . . . . . 7-24