


1190 Er Owner’s Manual
7
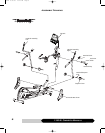
Assembly Instructions
Please take the assembly hardware out of the hardware package box. Lay all
the hardware out and take note for its locations. Follow the assembly instruc-
tion step by step to complete the assembly.
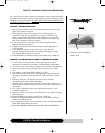
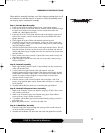
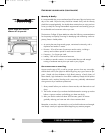
Step 1: Console Mast Assembly
1. Install console mast by carefully sliding it onto console mast receptor.
2. Insert 2pcs of M10 x 95mm bolts with lock washers and flat washers through
the lower set of holes on the receptor, into the console mast and to the
welded nuts. Hand tightens them first.
3. Insert 2pcs of M10 x 95mm bolts with flat washers through the upper set of
holes on the receptor, into the console mast and to the welded nuts. Hand
tightens them too.
4. Finally tighten all 4 sets of bolts with attached open-end wrench.
5. Connect the plug of the main wire harness, coming out of the console mast,
to the plug receptor coming out of base frame, taking care to install correctly.
(See plug alignment marks)
6. Store the excess harness back into the console mast and base frame. This will
keep the slack out of harness so that the wires will not pinched and short out.
Use the attached ty-warps to tighten down the wire harness onto console mast
and base frame.
7. Place console mast covers correctly in place (See R and L marks inside), and
align them with each other.
8. Insert and tighten console mast cover with two screws (M5 x 8mm) using a
Phillips screwdriver.
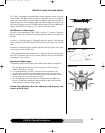
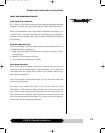
Step 2: Handrail Assembly
1. Attach right handrail (see the R mark on the handrail) onto the console mast
at the right handrail axle.
2. 2. Next, attach the right handrail to the right steparm. Insert the
handrail/steparm axle through the hole in the steparm and through the tube
at the bottom of handrail. Insert a M8 x 20 screw with lock washer and flat
washer into stepar
m axle and tighten it using an Allen wr
ench and an
open-end wrench on each side
3.
Inser
t the set-screw collar onto the handrail axle and tighten it with 2 set
scr
ews, using attached Allen wr
ench. Please make sur
e ther
e is no extra play
for the handrail.
4.
Assemble left handrail the same way as assembly the right handrail.
Step 3: Handrail & Steparm Covers Assembly
1.
Attach a set of steparm covers onto steparm using 2pcs of M5 x 8mm screws
and a Phillips scr
ewdriver
.
2. Attach a set of handrail covers onto handrail using 2pcs of M4 x40mm
scr
ews and nuts, using a Phillips screwdriver.
3.
3. Install the soft handrail grip onto the handrail axle by pushing it onto the
axle all the way.
4. Repeat the process of item 1 and 2 for the other side.
Step 4: U Handlebar Assembly
1. Insert the hand pulse harness through the opening of the console mast and
out of the console mounting plate.
2.
Assemble the handlebar onto the mount and inser
t and tighten the two M8 x
119OM 8/28/06 11:43 AM Page 9