


Assembling the Treadmill 29
To complete assembly of the treadmill base:
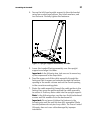
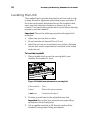
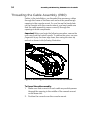
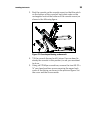
Important: Use your fingers to align and thread the four hood
fasteners properly. Then use a wrench to tighten the hood
fasteners completely as described in the following step.
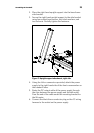
1. Thread the four black buttonhead screws (with black
washers) into their holes, leaving gaps of about ¹₄ inch
between the washers and the surface of the treadmill
frame.
2. Place the front of the hood on the two front screws. Make
sure the screws are aligned with the notches in the hood
and the washers are outside the hood.
3. Lower the back of the hood until the side screws rest
inside the notches in the internal wall of the hood. Make
sure the washers are outside the internal wall (on the
same side as the screw heads).
4. Tighten all four screws securely, starting with the front
screws.
Note: Using a hex wrench, reach through the openings in
the outer sides of the hood to tighten the side screws.
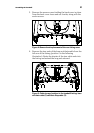
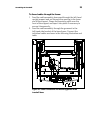
Figure 13: Hood and fastener placement
Checking Treadmill Alignment and
Adjusting the Running Belt
Before you allow anyone to use the treadmill, you must check
the alignment of the running belt and adjust it as needed. For
more information, refer to Checking the Alignment of the
Running Belt and Adjusting the Running Belt in the Maintenance
chapter.