


page 13
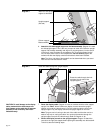
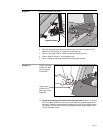
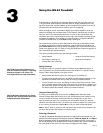
Diagram 5
a. Make sure that the cable is routed through the hole in the upright support.
b. Place a protective base (cardboard or plastic sheeting from the shipping
container) on the floor. Position the display console (display-side down) onto it.
c. Remove 2 screws (A) and washers (B) from the hardware kit.
d. Align the upright support mounts with the display console’s. Insert 2 screws and
washers. Tighten the screws securely with the hex key provided.
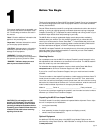
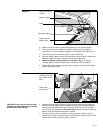
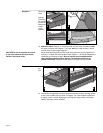
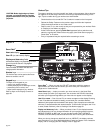
9. Attach the display console assembly to the base. Diagram 6. Take the
following steps to install the display console assembly onto the treadmill.
a. Position the display console and right upright support over the column support
mount located on the base.
Diagram 6
Connect the cable
and attach the right
side support to the
base.
b. Carefully lower the upright support and align the mounting holes. See Diagram 6
#2. Check that the display console is seated properly on the left upright support.
Insert 5 screws (A) with washers (B). Thread the screws into the unit, but leave
them loose for final adjustments. Do not securely tighten the screws until after the
display console and handrails have been installed.
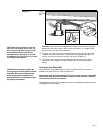
c. Plug the connector into its receptacle on the lower board. A definite “click” is
heard when the cable is properly attached. See Diagram 6 #3. If you do not hear
and feel the connector “snap” into place, reinsert it.
Attach the display
console.
Upright support
Cable
Right side support
Display console
(bottom side)
Route cable
through hole.
2
3
CAUTION: Do not crimp or pinch the cable!
Crimped or pinched cables are not covered
by the Precor limited warranty.
1