


page 11
You do not need any special knowledge or experience to set up the treadmill.
However, you will need assistance. Because of the size and weight of the treadmill, it
is recommended that at least three adult persons assemble it.
Installation Requirements
Follow these installation requirements when installing the treadmill.
If you do not install the
treadmill according to the following guidelines, you could void the Precor limited warranty.
• Set up the treadmill on a solid, flat surface. Unpack and assemble the
treadmill close to where you plan to use it. Make sure that the flat surface under
the unit is smooth and level. A level unit is required for the user’s safety and
proper operation.
• Provide ample space around the unit. Open space around the unit makes for a
safer mount and dismount.
• Fill out and mail the limited warranty card. Be sure that the treadmill is turned
OFF. To locate the serial number, place yourself at the rear of the treadmill facing
the display console, kneel down and look under the treadmill on the inboard-side
of the running bed of the left, rear corner. Write the serial number onto the Precor
limited warranty card found on the back cover of this manual. Refer to
Obtaining
Service
on page 9 and write the number(s) there as well.
• Use the appropriate voltage, dedicated circuit, and grounding as specified on
the treadmill. The treadmill is available in both 120-volt and 240-volt models. Refer
to the treadmill’s identification label to determine the voltage that your treadmill
requires. Both the 120-volt and 240-volt models require a dedicated 20 amp circuit.
Assembly Instructions
Take the following steps to assemble the treadmill. We recommend
at least
three
people help with assembling the unit.
Note: The M9.55 treadmill has the same assembly instructions. The differences
appear in the display console and course programs.
1. Obtain assistance. Ask for assistance to help assemble the treadmill. Have the
assistant(s) help place the shipping carton close to the location where you plan
to use the treadmill. Breakdown the side walls of the shipping carton so that they
lie flat. Remove the loose contents.
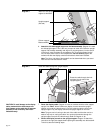
2. Remove the treadmill from its shipping pallet. Eight fasteners secure the treadmill
to its pallet. Use a socket and crescent wrench to loosen and remove the 4 lag bolts
that hold the treadmill to the pallet and the 4 screws (2 on each side) that thread
through the bracket and into the unit. Discard the fasteners. Once the fasteners have
been removed, obtain several assistants to lift the treadmill off the shipping pallet.
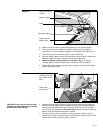
3. Make sure that the power is OFF. Check the ON/OFF power switch on the front
of the base assembly. Place the switch in the O (OFF) position. Make sure that
the treadmill is not plugged into a power source.
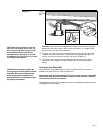
4. Loosen the screws that attach the hood to the base. With the supplied hex key,
loosen the 2 screws on the front panel and the 2 screws on the side (1 on each
side). To detach the hood from the base, stand at the side of the treadmill. Lift the
hood up slightly and slide it toward the rear of the unit. Refer to Diagram 11.
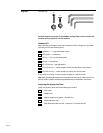
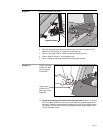
5. Remove 10 buttonhead screws (A) and washers (B) from the Hardware kit.
Place the washers on the screws and split the screws into two sets of 5. Put the
sets in easy reach of the column support mounts (5 screws per side).
CAUTION: Before assembling (or
disassembling) the unit, turn OFF the
treadmill and unplug it’s power cable
from the power outlet. Do not assemble
(or disassemble) the treadmill if it is
plugged into a power source. To avoid
injury and ensure your safety, get assis-
tance before lifting the treadmill off the
pallet and rolling it onto the floor. Do not
drop the unit.
Setting Up the Treadmill
2
CAUTION: Do not remove or otherwise
bypass the 3-prong plug with an adapter or
extension cord in order to use a non-
grounded outlet. Electrical damage can
occur if the treadmill is connected to an
improper power source.