


page 18
COMMERCIAL PRODUCTS DIVISION
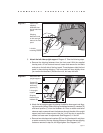
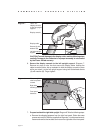
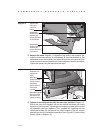
12. Replace the hood. Diagram 14. Reposition the hood on the treadmill. Re-
move four buttonhead screws (A) with washers (B) from the hardware kit. Two
buttonhead screws and washers are placed through the front panel and the
remaining two screws and washers are used to secure the hood to the siderail.
Tighten the screws using the appropriate hex keys.
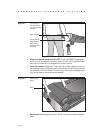
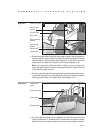
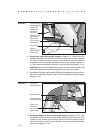
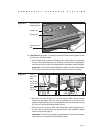
13. Tighten all mounting screws with the hex keys provided. Diagram 15.
Start at the front of the treadmill with the four screws that attach the upright
supports to the front panel. Tightening these screws first helps pull the rest of
the treadmill’s parts into alignment. Then, proceed with tightening the four
sockethead screws (D) that secure the upright supports, the four console
assembly screws (A), the handrail assembly screws (A) and (C), and the hood
screws (shown in Diagram 14).
Diagram 14
Replace the
hood and
secure it.
Buttonhead
screws (A) with
washers (B)
secure the front
of the hood.
Hood
Diagram 15
Secure the
fasteners and
replace the
hood.
Alternately
tighten the four
front panel
screws.
Alternately tighten
the four screws
that secure the
display console.
Alternately
tighten four side
upright screws.
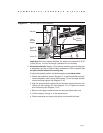
Buttonhead
screws (A) with
washers (B)
secure the hood
to the siderail.
1
2
1
2
3