


318 X 2-3/4"
~3/8 X 1"
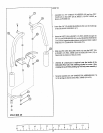
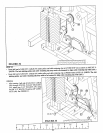
FIGURE 24
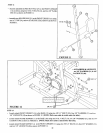
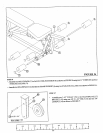
;TEP 24
¯ Securely attach BACK SEAT PAD (26) to BACK PAD SUPPORT (14) using two 3/8 X 2-3/4" (38) and two 3/8" WASHERS (51).
¯
Securely attach LEG SEAT PAD (28) to HINGE TABS (78) using two 3/8 X 1" (35) and two 3/8" WASHERS (51) as
FIGURE 24.
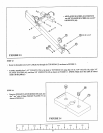
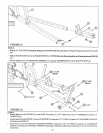
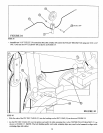
STEP 25
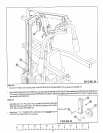
Assemble the LEG CURL/EXTENSION (4) to the LEG SUPPORT (15) using the following steps:
1/2 X 3"
FIGURE 25
1/2" LOW
HEIGHT
18
o Assemble one 3-1/2" PULLEY(79) to the LEG
SUPPORT (15) using one 3/8 X 3" BOLT (39),
two 3/8 X 1/2" SPACERS (99), one CABLE
RETAINING CLIP (58) and one 3/8" LOCK
NUT (48). (NOTE: Make sure LEG EXT.
CABLE (90) is runn|ng under the PULLEY.)
¯
Insert two 1/2" FLANGE BEARINGS (67)
into the LEG CURL/EXTENSION (4).
¯ Assemble the LEG CURL/EXTENSION (4)
the BENCH FRAME (15) using one 1/2 X
(42), two BOLT COVER CAPS (97),
BOLT COVER WASHERS (98) and one 1/2"
LOW IIEIGIIT L(L---KNLrr (50). (NOTE:
Securely tighten, then back nut off 1/4 turn
to allow the LEG CURL/EXTENSION (4)
rotate freely.)
¯ Assemble the ball end of the LEG EXT.
CABLE (90) to the KEYHOLE CLEVIS (100)
as shown in FIGURE 25.
SECURE the KEYHOLE CLEVIS (100) to the
tab on the LEG CURL/EXTENSION (4) using
one 3/8 X 1" BOLT (35) and one 3/8" LOCK
NUT (48) as shown in FIGURE 25. (NOTE:
Do not overtighten! Keyhole clevis should
rotate freely.)