


2240-9
To input your current latitude and longitude
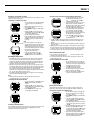
1. On the AREA Screen, use K and L to
move the cursor to INPUT, and then
press ● to display the AREA:INPUT
Screen.
2. Input the latitude and longitude of the
area.
• See “To input the latitude and longitude”.
3. Use ● to move the flashing to the GMT differential setting.
4. Use K (+) or L (–) to change the GMT differential setting.
• Holding down either button changes the setting at high speed.
• The GMT differential is the time difference between the area whose data
you are setting and Greenwich Mean Time.
• You can input a GMT differential value in the range from –11.0 to +13.0, in
units of 0.25 hours.
5. After inputting the GMT differential, press ● to return to the SET UP
Screen.
6. To exit the SET UP Screen, press MODE or MENU.
• If the message “NOW EXECUTING” appears on the display, wait until the
message disappears.
7. To return to the Timekeeping or GPS Mode, press MODE or MENU.
8. Next, you should set the map datum for the area.
• See “Setting a Datum” for more information.
Setting a Datum
Map datums are used to compensate for the fact that the Earth is neither flat
nor a perfect sphere or even ellipsoid. Specification of a map datum for the
area you are located is required in order to ensure proper GPS
measurements.
You can use either of the following two methods to set a map datum on this
watch.
• Selecting a datum from a built-in datum list
• Inputting map datum parameters manually
Important!
• You should specify a map datum after you specify area data by selecting a
landmark in landmark memory or after you input your current latitude and
longitude manually.
Specifying Datum Parameters by Selecting from a List of Built-
in Map Datums
Use the procedure below to specify datum parameters automatically.
To specify datum parameters by selecting from a list of built-in
map datums
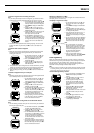
1. In the Timekeeping or GPS Mode, press
MENU twice to display the MENU
Screen.
2. Use K and L to move the cursor to
SET UP, and then press ● to display the
SET UP Screen.
3. Use K and L to move the cursor to
MAP DATUM, and then press ● to
display the MAP DATUM Screen.
4. Use K and L to scroll through the
datum names on the screen until the one
you want is selected.
• Holding down either button moves the
cursor at high speed.
• See “DATUM LIST” for a full list of datum
names and the applicable area each one
covers.
5. After selecting the name of the datum you want to specify, press ● to
register it and return to the SET UP Screen.
6. Press MODE or MENU twice to return to the Timekeeping or GPS Mode.
Manually Inputting Map Datum Parameters
The GPS constellation of satellites generates latitude and longitude positions
on the World Geodetic System 1984 (WGS 84) horizontal datum. Though
WGS 84 is the latest standard for the entire world, higher precision can be
obtained using a datum for a particular local area. Use the following
procedure to select the datum that is appropriate for the area where you are
taking GPS measurements with this watch.
Note
• See “Datums” for more information about datums and how they affect GPS
measurements.
Note
• Parameters you input for dA and dF here are also used as ellipsoid values
when converting latitude and longitude to UTM coordinates.
To input map datum parameters
1. In the Timekeeping or GPS Mode, press
MENU twice to display the MENU
Screen.
2. Use K and L to move the cursor to
SET UP, and then press ● to display the
SET UP Screen.
3. Use K and L to move the cursor to
MAP DATUM, and then press ● to
display the MAP DATUM Screen.
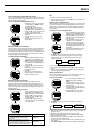
4. Use K and L to move the cursor to
USER, and then press ● to display the
DATUM:USER Screen.
5. Use K and L to move the cursor to the
parameter field you want to change, and
then press ●.
6. Input values for each of the parameters
(dX, dY, dZ, dA, dF).
• See “To change a numeric setting”.
7. After inputting a parameter, press ●. Use K and L to select the other
parameters on the DATUM:USER Screen, press ●, and input a value for
each one.
Note
• For the dF value, you can input five decimal places only.
• When the +/– sign of a value is selected, each press of K or L toggles
between + and –.
8. After all the parameters are the way you want, press ●.
9. On the DATUM:USER Screen, use K and L to move the cursor to
DONE, and then press ● to apply your settings and return to the SET UP
Screen.
10.Press MODE or MENU twice to return to the Timekeeping or GPS Mode.
Using the Landmark List
• The Landmark List Screen is like a data bank of locations from which you
can select start points, waypoints, destinations, and AREA data. You can
also display landmark symbols when viewing track log data on the Plot
Screen.
• The following procedures explain how to add a new landmark, and how to
edit and delete landmarks.
Note
• The Landmark List can contain up to 200 landmarks.
• Editing or deleting a landmark in a Route Plan does not affect the data in
the Landmark List.
Preset Data
The watch comes pre-programmed with landmark list data for the latitude,
longitude and altitude of the world’s major mountains. See “PRE-
PROGRAMMED LANDMARK LIST”. You can use this data as it is, or you can
edit or delete it to suit your own needs.
• Note that once you edit or delete the preset data it cannot be recovered.
• Use the procedures under “To edit a landmark” and “To delete a landmark”
to change the preset data.
• Local names for mountains may differ from those pre-programmed in the
“PRE-PROGRAMMED LANDMARK LIST”.
• As described under “Datums”, latitude, longitude and altitude may differ
according to the map datum being employed to produce them. Because of
this, the latitudes, longitudes, and altitudes pre-programmed in the “PRE-
PROGRAMMED LANDMARK LIST” may differ form positions plotted on
maps used by you.
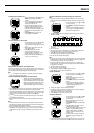
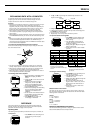
L
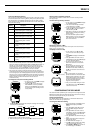
Difference of x-coordinate distance from WGS84 position
Difference of y-coordinate distance from WGS84 position
Difference of z-coordinate distance from WGS84 position
Difference to the semi-major axes of the WGS84 earth
spheroid
Difference of x-coordinate distance from WGS84 earth
spheroid
dX
dY
dZ
dA
dF
Parameter Type Parameter Conversion Method
–9999 to +9999
–9999 to +9999
–9999 to +9999
–999 to +999
–0.00000000 to –0.00009999
+0.00000000 to +0.00009999
dX
dY
dZ
dA
dF
Parameter Type Input Range
L