


2240-10
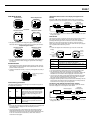
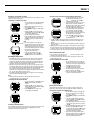
To display the Landmark List
1. In the Timekeeping or GPS Mode, press
MENU twice to display the MENU
Screen.
2. The cursor should already be located
next to LAND MARK, so press ● to
display the Landmark List.
• A screen appears showing how many
records are still available for saving new
landmarks (FREE), and how many
landmarks are in memory (USED). After a
few seconds, the actual Landmark List
appears.
3. Press MODE twice to return to the
Timekeeping or GPS Mode.
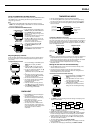
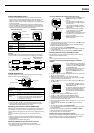
To view a landmark’s record data
1. On the Landmark List, use K and L to
move the cursor to the name of the
landmark whose record data you want to
view.
• Holding down either button moves the
cursor at high speed.
2. Press ● to display the selected
landmark’s record data screen.
• The record data of a landmark includes
latitude, longitude, and altitude.
3. After you are finished, press ● again to
return to the Landmark List.
Adding a New Landmark to the Landmark List
There are two methods you can use to add a landmark to the Landmark List.
You can register data about your current location with the press of a button, or
you can manually input latitude, longitude, and altitude data.
Note
• “____” is indicated for the altitude in the landmark data record if altitude
data is not available for some reason.
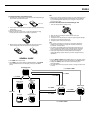
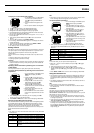
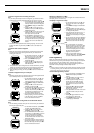
To add a landmark by registering a current location
While in the Timekeeping Mode with the
Position Screen in the lower display area or
while a GPS Mode Screen is on the display
(except for the Altitude Graph Screen), hold
down K for about one second, until the
message “SAVING” appears on the display.
• This creates a new landmark in the Landmark List, containing the following
information about your current position: latitude, longitude, altitude.
• The initial default landmark name is the date and time you register the new
landmark. The initial default symbol for the landmark is
. You can change
the initial name and symbol using the procedure under “To edit a
landmark”.
• “______” is shown in place of the altitude value when there is no altitude
data available for the landmark.
• It takes about two seconds for the new landmark registration operation to
finish.
Note
• A landmark added to the Landmark List is assigned a landmark number.
With the above procedure, the new landmark is automatically assigned the
lowest available (unused) landmark number.
• If there are already 200 landmarks on the Landmark List, the message
“MEMORY FULL” appears when you try to save a new one. You will have
to delete landmarks you no longer need before you will be able to store
more.
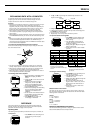
L
L
K
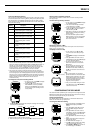
To add a landmark by manually inputting its record data
Note
• There are a number of waypoint database Websites on the Internet that
contain useful landmark information about the locations of places around
the world.
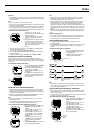
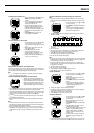
1. On the Landmark List, use K and L to
move the cursor to “_:_____”.
2. Press MENU to display the FUNCTION
Screen.
3. The cursor should already be located
next to EDIT, so press ● to display the
New Landmark Input Screen.
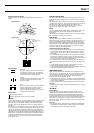
4. Use K and L to select the symbol you want to assign to the landmark,
and then press ●.
Press L. Press K.
5. To the right of the symbol, input the name you want to give to the
landmark.
• See “To input text”.
• You must input a name for the landmark. The flashing will not advance to
the latitude field if there is no landmark name on the screen.
6. Press ● to move the flashing to the latitude field.
7. Input the latitude and longitude, and then press ●.
• See “To input the latitude and longitude”.
Note
• If you have your watch set up for UTM coordinates, you have to input UTM
coordinates here instead of latitude and longitude values. See “Specifying
the Position Display Format” for more information.
• If you input UTM coordinates, the watch converts them to latitude and
longitude values, then reconverts the results back to the UTM coordinates
that appear on the display.
8. Input the altitude of the landmark.
• See “To change a numeric setting”.
9. After inputting the altitude, press ● to apply the setting.
10.Press ● again to return to the Landmark List.
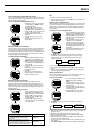
To edit a landmark
1. On the Landmark List, use K and L to
move the cursor to the landmark you
want to edit.
• Holding down either button moves the
cursor at high speed.
2. Press MENU to display the FUNCTION
Screen.
3. The cursor should already be located
next to EDIT, so press ● to display the
Landmark Editing Screen for the
selected landmark.
4. Change the content of the landmark as you want.
• Use steps 4 through 8 under “To add a landmark by manually inputting its
record data” to edit the content of a landmark.
5. After making the changes you want, press ●.
6. Press ● again to return to the Landmark List.
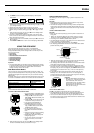
To delete a landmark
1. On the Landmark List, use K and L to
move the cursor to the landmark you
want to delete.
• Holding down either button moves the
cursor at high speed.
2. Press MENU to display the FUNCTION
Screen.
3. Use K and L to move the cursor to
CLEAR, and then press ●.
4. On the confirmation message screen that
appears, use K and L to move the
cursor to YES, and then press ● to
delete the landmark and return to the
Landmark List.
• The space on the Landmark List where
the deleted record was located now
shows “_:_______”.
• To cancel the delete operation without deleting anything, move the cursor
to NO in the above step, and then press ● to return to the Landmark List.
L