


2240-2
GETTING READY
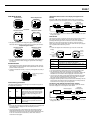
Unpacking
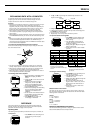
Make sure all the items shown on this page are included when you unpack
your watch.
Important!
• Before using the watch for the first time, be sure you charge the battery, set
the current time and date, and configure the GPS mode.
• The GPS function of the watch is tested at the factory before shipment, and
the measurement results of the test may still be in memory when
purchasing the watch. This data will be deleted automatically when you
perform a GPS measurement operation.
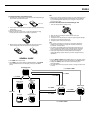
Watch Interface/Charger Unit
AC Adaptor Serial Cable
CD-ROM User’s Guide
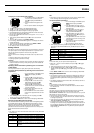
Charging the Battery
• The watch contains a rechargeable
lithium ion battery that supplies power for
normal operation.
• Low battery power is indicated when the
BATT indicator at the bottom of the
display turns on. Charge the battery as
soon as possible after the BATT indicator
turns on.
• Recharging the battery after it goes
completely dead causes the date and
time setting of the watch to revert to:
2000- 1- 1 0: 00 00. Set the correct date
and time after charging is complete.
• You can charge the battery using either
AC power or battery power.
Important!
• Use only the Interface/Charger Unit and AC Adaptor that come with this
watch to charge its battery.
• Proper charging may be impossible if the contacts inside the Interface/
Charger Unit tray or on the watch become dirty. Keep the contacts clean by
wiping them periodically with a dry cotton swab.
• Never allow the Interface/Charger Unit or watch contacts to become
shorted.
• Best results are obtained when charging is performed under room
temperature (around 23°C).
• Do not subject the Interface/Charger Unit to vibration while charging is
taking place. Doing so can result in a poor connection and improper
charging.
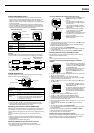
To charge the battery using AC power
Important!
• When charging the battery, make sure you turn on Interface/Charger Unit
power and confirm that its indicator lamp is lit green
before
you mount the
watch for charging. Mounting the watch onto the Interface/Charger Unit and
then turning on power can result in incomplete charging of the watch’s
battery.
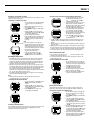
1. Connect the AC Adaptor to the Interface/Charger Unit and plug the power
cord into a wall outlet.
BATT indicator
8
User’s Guide
Bedienungsanleitung
Mode d’emploi
Guía del usuario
Warranty Certificate
Garantieschein
Certificat de garantie
Certificado de garantía
Guida dell’utilizzatore
Guia do Usuário
Certificato di garanzia
Certificado de Garantia
GPS
Module No. 2240
2. Slide the power switch in the direction indicated by the arrow, and make
sure the indicator lamp lights green.
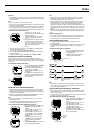
3. Open the terminal cover on the side of the watch.
• The terminal cover may be a bit stiff and tend to want to close when the
watch is new. Hold it open when you perform the following steps.
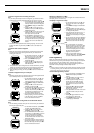
4. Raise the rod on the Interface/Charger Unit that holds down the watch’s
terminal cover.
• The rod is quite thin, so handle it carefully and take care you do not
damage it.
5. Angle the left side (9 o’clock side) of the watch into the Interface/Charger
Unit tray so the tab in the tray enters the hole in the side of the watch.
• Never touch the terminals of the watch or the Interface/Charger Unit.
• The terminals of the Interface/Charger Unit are gold and silver. This is
normal and does not indicate a defective product.
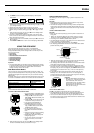
6. Lay the watch the rest of the way into the tray and lower the rod to secure
the cover in place.
7. Next, slide the tray in the direction indicated by the arrow until it locks into
place.
• Make sure that the terminal cover stays open when you perform the above
steps. If the cover closes unexpectedly and is not held down by the rod, the
cover and Interface/Charger Unit can become damaged when you slide the
tray. Always double check to make sure the cover is fully opened and held
down by the rod before you slide the tray.
• If the cover is stiff when the watch is still new, carefully bend it open as far
as it will go to loosen it up.
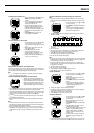
• The indicator lamp on the Interface/Charger Unit lights red to indicate that
charging has started when the watch is correctly mounted in place. This
indicator lamp goes out when charging is complete.
• It takes about 70 minutes to fully charge a completely depleted battery.
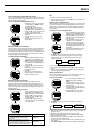
8. After charging is complete, remove the watch from the Interface/Charger
Unit and then turn off power. See “To remove the watch from the Interface/
Charger Unit” for details.
Important!
• Make sure the Interface/Charger Unit is off when you are not using it.
• Enter the Timekeeping Mode and check the date and time setting. If it is not
correct, perform the procedure under “Setting the Current Time and Date
Manually” to correct it.
Rod