


2240-8
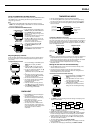
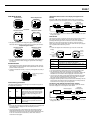
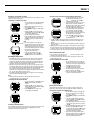
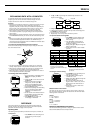
Graphical Navigation Screen
• After you set up the watch by defining your destination and landmarks
along the way, the Graphical Navigation Screen shows the direction and
distance from your current location to your destination. The Graphical
Navigation Screen can also be used to display your current speed, altitude,
and other information.
• You must define your destination before using the Graphical Navigation
Screen. See “Making a Landmark Your Destination” for more information.
• You can use either of the two orientations for bearing measurements. See
“Specifying the Bearing Orientation” for more information.
NORTH UP Orientation HEADING UP Orientation
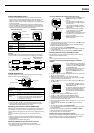
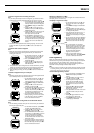
Graphical Navigation Screen Lower Display Area (Split-screen
Format)
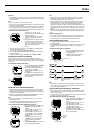
Each press of L while the Graphical Navigation Screen is on the display
cycles the contents of the lower display area in the sequence shown below.
Latitude/Longitude
BRG/DIST(Destination
Pointer/Distance)
ALTI DOP (Altitude)
HDG/SPD
(Heading/Speed)
MAX SPD
(Maximum Speed)
Full Screen
• See “Lower Display Area Items” for details about the contents of each lower
display area screen.
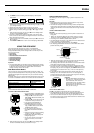
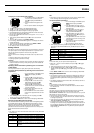
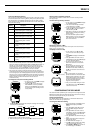
Altitude Graph Screen
The Altitude Graph Screen shows a bar graph based on altitude readings,
which are stored along with track log data.
Note
• You can use K (+) and L (–) to scroll through altitude data records.
• A white space in the graph indicates a GPS measurement during which
altitude data could not be obtained for some reason.
Specifying Your Current Location (AREA Data)
AREA data lets the watch know where it is currently located. The watch uses
this information as a reference point for making GPS measurements. You
need to update this setting whenever you move from one geographic area to
another.
There are three different methods you can use to specify your current
location.
• Selecting a built-in area city and setting the AREA data assigned to it
• Selecting a landmark stored in landmark memory and setting the AREA
data assigned to it
• Inputting your current latitude and longitude
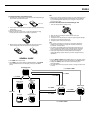
Specifying AREA Data by Selecting a Built-in Area City
Use the procedure below to make AREA settings automatically.
• See “AREA LIST” for a full list of area city names and the area data
associated with each name.
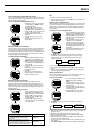
To specify AREA data by selecting a built-in area city
1. In the Timekeeping or GPS Mode, press
MENU twice to display the MENU
Screen.
2. Use K and L to move the cursor to
SET UP, and then press ● to display the
SET UP Screen.
3. The cursor should already be located
next to AREA, so press ● to display the
AREA Screen.
4. The cursor should already be located
next to SELECT CITY, so press ● to
display the AREA:CITY Screen.
5. Use K and L to scroll through the area
city names on the screen until the one
you want is selected.
• Holding down either button moves the
cursor at high speed.
6. After selecting the area city name you want to specify, press ● to register
it and return to the SET UP Screen.
• Selecting an area city name automatically sets the appropriate latitude,
longitude, GMT differential and datum.
7. To exit the SET UP Screen, press MODE or MENU.
• If the message “NOW EXECUTING” appears on the display, wait until the
message disappears.
8. To return to the Timekeeping or GPS Mode, press MODE or MENU.
Specifying Area Data Using Landmark Memory Data
This procedure lets you specify area data by recalling landmark data you
previously stored in landmark memory.
Note
• See “Using the Landmark List” for information about landmarks.
To specify area data by selecting a landmark in landmark
memory
1. On the AREA Screen, use K and L to
move the cursor to SELECT LMK (Select
Landmark), and then press ● to display
the AREA:LMK Screen.
• The message “NO LMK” appears if there
are no landmarks in memory. If this
happens, press MENU to return to the
AREA Screen.
2. Use K and L to scroll through the landmark names on the screen until
the one you want is selected.
• Holding down either button moves the cursor at high speed.
3. After selecting the name of the landmark you want to specify, press ● to
register it and return to the SET UP Screen.
4. Use K and L to move the cursor to AREA, and then press ● to display
the AREA Screen.
5. Use K and L to move the cursor to
INPUT, and then press ● to display the
AREA:INPUT Screen.
• The flashing is positioned for latitude input
first. Input of a latitude and longitude is
not required here, so perform step 6 to
move the flashing to the GMT differential
setting.
6. Use ● to move the flashing to the GMT differential setting.
7. Use K (+) or L (–) to change the GMT differential setting.
• Holding down either button changes the setting at high speed.
• The GMT differential is the time difference between the area whose data
you are setting and Greenwich Mean Time.
• You can input a GMT differential value in the range from –11.0 to +13.0, in
units of 0.25 hours.
8. After inputting the GMT differential, press ● to return to the SET UP
Screen.
9. To exit the SET UP Screen, press MODE or MENU.
• If the message “NOW EXECUTING” appears on the display, wait until the
message disappears.
10.To return to the Timekeeping or GPS Mode, press MODE or MENU.
11.Next, you should set the map datum for the area.
• See “Setting a Datum” for more information.
Inputting Your Current Latitude and Longitude
When you know the latitude and longitude of your current location, you can
use the following procedure to input them and specify the time difference
between your current location and GMT (GMT differential).
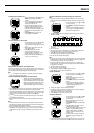
Destination
North Up indicator
Destination pointer
Display Item Description
Altitude graph
Range
Altitude data record
Displays the landmark name of your destination when
one is defined.
Indicates that the watch is currently set up for NORTH
UP orientation.
Points the way to your destination.
Destination
North Up
indicator
Destination
pointer
L
This value shows the range of the graph in units of
100.
Plots track data altitude readings.
Shows the data record for the currently selected
altitude reading. The record shows the time (24-hour)
and date of the measurement, and the altitude value.
The point that represents the currently displayed
record flashes on the graph.
Range
Altitude graph
Altitude data
record
Display Item Description
GMT differential
City code