


2240-12
To insert a waypoint into an existing route plan
Note
• If your route plan already contains nine waypoints, you will have to delete
at least one of the existing waypoints before you can insert a new one.
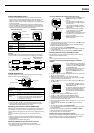
1. On the Route Plan Screen, use K and L
to move the cursor to the waypoint above
which you want to insert the new waypoint.
2. Press MENU to display the FUNCTION
Screen.
3. Use K and L to move the cursor to
INSERT, and then press ● to display the
INSERT W.P Screen.
4. Use K and L to move the cursor to the
landmark you want to insert into the
route plan, and then press ●.
5. On the INSERT? confirmation screen
that appears, use K and L to move the
cursor to YES, and then press ● to insert
the waypoint above the one you selected
in step 1 and return to the Route Plan
Screen.
• To cancel the insert operation without inserting anything, move the cursor
to NO in the above step, and then press ● to return to the Route Plan
Screen.
To edit the data record of waypoint
Note
• Editing the data record of waypoint listed on the Route Plan Screen does
not affect the data record of the original landmark you selected when
creating your route plan.
1. On the Route Plan Screen, use K and
L to move the cursor to the waypoint
whose data record you want to edit.
2. Next, press MENU to display the
FUNCTION Screen.
3. Use K and L to move the cursor to
EDIT, and then press ● to display the
EDIT W.P Screen.
4. Use procedures in steps 5 through 8 under “To add a landmark by manually
inputting its record data” to edit the contents of the waypoint’s data record.
• You can change the waypoint’s latitude, longitude, and altitude data.
5. After everything is the way you want, press ● to return to the Route Plan
Screen.
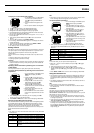
To delete a waypoint from your route plan
Note
• Deleting a waypoint from your route plan causes all of the waypoints below
it to be shifted upwards on the Route Plan Screen.
1. On the Route Plan Screen, use K and
L to move the cursor to the waypoint
whose data record you want to delete.
2. Press MENU to display the FUNCTION
Screen.
3. Use K and L to move the cursor to
DELETE, and then press ●.
4. On the DELETE? confirmation screen that
appears, use K and L to move the
cursor to YES, and then press ● to delete
the waypoint you selected in step 1 and
return to the Route Plan Screen.
• To cancel the delete operation without
deleting anything, move the cursor to NO
in the above step, and then press ● to
return to the Route Plan Screen.
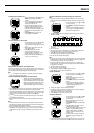
To reverse the order of waypoints on the Route Plan Screen
Note
• Use the following procedure when you want to return from your destination
back to your original start point.
1. On the Route Plan Screen, press MENU
to display the FUNCTION Screen.
2. Use K and L to move the cursor to
REVERSE, and then press ●.
3. On the REVERSE? confirmation screen
that appears, use K and L to move the
cursor to YES, and then press ● to
reverse the sequence of waypoints on
the Route Plan Screen and return to the
Route Plan Screen.
• To cancel the sequence reverse operation
without doing anything, move the cursor to
NO in the above step, and then press ● to
return to the Route Plan Screen.
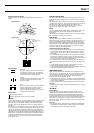
Displaying a Waypoint on a Map
The following procedure lets you select a waypoint on the Route Plan Screen
and display it on an on-screen map.
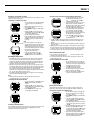
To display a waypoint on a map
1. On the Route Plan Screen, use K and
L to move the cursor to the waypoint
you want.
2. Press MENU to display the FUNCTION
Screen.
3. Use K and L to move the cursor to
SHOW MAP, and then press ● to display
the Waypoint Map Screen.
• If you selected the start point in step 1, it
is indicated on the map as “S”. Other
waypoints are indicated by their waypoint
numbers.
• You can change the scale of the Waypoint
Map Screen by pressing K (to decrease
the scale value and zoom in) and L (to
increase the scale value and zoom out).
Note
• See “Turning Display of a Landmark
Symbol On and Off” for information about
displaying other landmarks in the vicinity
of the current landmark, and “Turning a
Track Point’s Display Status On and Off”
for information about displaying
waypoints, and track points.
4. After you are finished viewing the
Waypoint Map screen, press ● or MODE
to return to the Route Plan Screen.
Track Log Memory
When you perform GPS measurements, track log records are created and
stored into track log memory automatically at a fixed recording interval (which
you can specify using the procedure under “To change the track point
recording interval”). Track log records are used when plotting points on the
Plot Screen and for producing the Altitude Graph Screen.
Note
• Track log memory can hold up to 400 records. After 400 records are stored
in track log memory, each new GPS measurement deletes the oldest track
log record to make room for the new one.
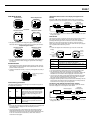
To view track log memory records
1. In the Timekeeping or GPS Mode, press
MENU twice to display the MENU
Screen.
2. Use K and L to move the cursor to
TRACKS, and then press ●.
• A screen appears showing how many
records are unused (FREE) and how
many records are in memory (USED).
After about one second, the Track List
appears.
• Pressing K, ● or L while the FREE/
USED Screen is displayed changes
directly to the Track List.
3. Use K and L to move the cursor to the
track whose data record you want to
view.
4. Press ●.
• Pressing ● toggles between the Track
List and the track’s data record.
5. Press MODE twice to return to the
Timekeeping or GPS Mode.
L
L
L
L
(About 2 seconds)
L
L