


2240-13
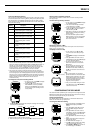
Track Point Recording Interval
The track point recording interval determines how often a track point record is
created and stored into the Track Log Memory while you are performing GPS
data measurements. The following table lists all of the track point recording
interval settings that are available, and describes how the each setting affects
track point record storage.
• The initial default setting is 10 minutes.
• The start and end of each period are in accordance with the time being
kept by the watch’s Timekeeping Mode. With the 10 min default setting, for
example, 10-minute periods would be from the top of each hour to 10
minutes after the hour, from 10 minutes after the hour to 20 minutes after
the hour, and so on. If you select 60 min, only the first successful
measurement achieved each hour (from :00 to :59) is recorded.
• After a track point record is created and stored for the first successful
measurement achieved during a period, no more records are created until
the time being kept in the Timekeeping Mode enters the next period of the
interval. If you are using the 10 min default setting and achieve successful
measurements at 9:05, 9:06, 9:08, 9:12, and 9:15, for example, Track Log
Memory records are created and stored for the 9:05 and 9:12
measurements only.
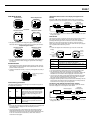
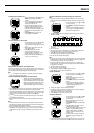
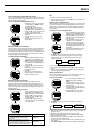
To change the track point recording interval
1. On the Track List, press MENU to display
the FUNCTION Screen.
2. Use K and L to move the cursor to
TRK INTERVAL, and then press ● to
display the TRK INTERVAL Screen with
the current track point recording interval
setting flashing.
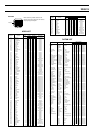
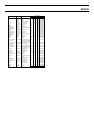
3. Use K and L to cycle through the track point recording interval settings
in the sequence shown below.
Press K. Press L.
10 min
20 min
30 min 60 min
15 min
5 min
2 min
1 min OFF
• The initial default setting is 10 minutes.
• Selecting OFF turns off track data recording.
4. After the setting is the way you want, press ● to return to the Track List.
Clearing Track Log Memory Contents
Use the following procedure to delete all of the records currently stored in
track log memory.
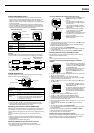
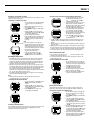
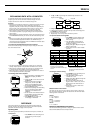
To clear track log memory contents
1. On the Track List, press MENU to display
the FUNCTION Screen.
2. The cursor should already be located
next to DELETE, so press ●.
3. On the confirmation screen that appears,
use K and L to move the cursor to
YES, and then press ●.
• After about 10 seconds, the message “NO
DATA” appears, indicating that track log
memory is clear.
• To cancel the delete operation without
deleting anything, move the cursor to NO
in the above step, and then press ● to
return to the Track List.
Displaying a Track on a Map
The following procedure lets you select a track point on the Track List and
display it on an on-screen map.
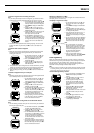
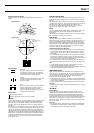
To display a track on a map
1. On the Track List, use K and L to
move the cursor to the track point you
want.
2. Press MENU to display the FUNCTION
Screen.
3. Use K and L to move the cursor to
SHOW MAP, and then press ● to display
the Track Point Map Screen.
• The track point you select in step 1 is
shown in the center of the Track Point
Map Screen.
• You can change the scale of the Track
Point Map Screen by pressing K (to
decrease the scale value and zoom in)
and L (to increase the scale value and
zoom out).
Note
• See “Turning Display of a Landmark
Symbol On and Off” for information about
displaying other landmarks in the vicinity
of the current landmark, and “Turning a
Track Point’s Display Status On and Off”
for information about displaying
waypoints, and track points.
4. After you are finished viewing the Track
Point Map Screen, press ● or MODE to
return to the Track List.
CONFIGURING THE GPS MODE
This section describes procedures you need to perform to configure the GPS
Mode before actually performing GPS measurements. Most of these settings
need to be made only the first time you use the watch.
Changing the DOP Value
See “How the Watch Uses the DOP Value” for information about how the
watch uses the DOP value you specify here.
To change the DOP value setting
1. In the Timekeeping or GPS Mode, press
MENU twice to display the MENU
Screen.
2. Use K and L to select SET UP, and
then press ● to display the SET UP
Screen.
3. Use K and L to move the cursor to
ACCURACY, and then press ● to display
the ACCURACY Screen with the DOP
value setting flashing.
4. Use K and L to set the DOP value you
want.
• Holding down either button changes the
setting at high speed.
• The initial DOP value setting is 10.
5. Press ● to apply your DOP value setting
and return to the SET UP Screen.
6. Press MODE or MENU twice to return to
the Timekeeping or GPS Mode.
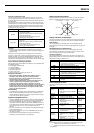
Interval
Description
Maximum Records
Setting Stored per Hour
OFF
1 min
2 min
5 min
10 min
15 min
20 min
30 min
60 min
• Turns off track point record storage.
• Records first successful measurement
achieved during each 1-minute period.
• Records first successful measurement
achieved during each 2-minute period.
• Records first successful measurement
achieved during each 5-minute period.
• Records first successful measurement
achieved during each 10-minute
period.
• Records first successful measurement
achieved during each 15-minute
period.
• Records first successful measurement
achieved during each 20-minute
period.
• Records first successful measurement
achieved during each 30-minute
period.
• Records first successful measurement
achieved during each 60-minute
period.
0
60
30
12
6
4
3
2
1
L
L
L
(About 2 seconds)
L