


2240-11
Displaying a Landmark on a Map
The following procedure lets you select a landmark on the Landmark List and
display it on an on-screen map.
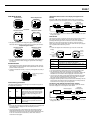
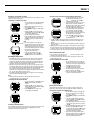
To display a landmark on a map
1. On the Landmark List, use K and L to
move the cursor to the landmark you
want.
• Holding down either button moves the
cursor at high speed.
2. Press MENU to display the FUNCTION
Screen.
3. Use K and L to move the cursor to
SHOW MAP, and then press ● to display
the Landmark Map Screen.
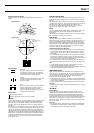
• You can change the scale of the
Landmark Map Screen by pressing K (to
decrease the scale value and zoom in)
and L (to increase the scale value and
zoom out).
Note
• See “Turning Display of a Landmark
Symbol On and Off” for information about
displaying other landmarks in the vicinity
of the current landmark, and “Turning a
Track Point’s Display Status On and OFF”
for information about displaying
waypoints, and track points.
4. After you are finished viewing the
Landmark Map Screen, press ● or
MODE to return to the Landmark List.
Creating a Route Plan
• The Route Plan Screen of the watch lets you select a series of locations
from the Landmark List and plan a route from one point (start point) to
another point (destination). Each of the locations you pass through while
traveling, including your initial start point and final destination is called a
“waypoint,” and a group of waypoints is called a “route.”
• Before you start out on a hike or trip, you can input your planned route on
the watch by specifying a start point and up to nine more waypoints. Since
you must add waypoints to the Route Plan Screen by selecting them from
the Landmark List, the waypoints you want to use must already be
registered in the Landmark List. After adding a waypoint from the Landmark
List, you can edit its data record if you want.
• The following procedures explain how to put together a route, and how to
add, insert, edit, and delete waypoints.
Note
• Editing or deleting a landmark in a Route Plan does not affect the
corresponding data in the Landmark List.
To display the Route Plan Screen
1. In the Timekeeping or GPS Mode, press
MENU twice to display the MENU
Screen.
2. Use K and L to move the cursor to
WAY POINT, and then press ● to display
the Route Plan Screen.
3. Press MODE twice to return to the
Timekeeping or GPS Mode.
Creating a New Route Plan
Use the following procedure when you want to put together a new route. Later
you can edit the contents of a route plan by changing the order of the
waypoints, inserting new waypoints, etc.
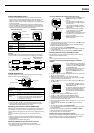
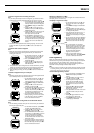
To create a new route plan on a blank Route Plan Screen
1. On the Route Plan Screen, the cursor
should already be located next to
“S:_____” (start point), so press ● to
display the Landmark List.
• If your Landmark List does not have any
landmarks, the message “NO DATA”
appears for about two seconds, and then
the Route Plan Screen reappears.
2. Use K and L to select the landmark
you want to define as the start point of
your route plan, and then press ●.
• This returns to the Route Plan Screen
with the landmark you selected shown for
the start point of your route plan.
3. Use K and L to move the cursor to
“ :_____”, and then press ● to display
the Landmark List.
4. Use K and L to select the landmark you want to define for your next
waypoint, and then press ● to register it and return to the Route Plan
Screen.
5. Repeat steps 3 and 4 for the rest of the waypoints you want to specify for
your route plan.
• Basically, you should specify waypoints in the sequence you plan to pass
them (first waypoint first, second waypoint second, etc.) You will, however,
be able to change a route plan using the procedures that follow this one.
• A route plan can have one start point, and up to nine other waypoints.
About the Start Point Name
• The start point name appears as “S:_____” if there is currently no route
defined on the Route Plan Screen.
• If the start point name has more than seven characters, it scrolls on the
display from right to left.
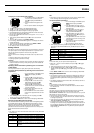
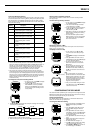
To view a waypoint’s record data
1. On the Route Plan Screen, use K and
L to move the cursor to the start point
name or the name of the waypoint whose
record data you want to view.
2. Press ● to display the selected
waypoint’s record data screen.
• The record data of a waypoint includes
latitude, longitude, and altitude.
3. After you are finished, press ● again to
return to the Route Plan Screen.
Editing Your Route Plan
Use the following procedures when you want to change the order of the
waypoints in your route plan, insert new waypoints, delete waypoints, etc.
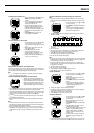
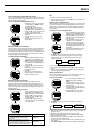
To change a waypoint to a different one
1. On the Route Plan Screen, use K and
L to move the cursor to the waypoint
you want to change.
2. Press MENU to display the FUNCTION
Screen.
3. The cursor should already be located
next to CHANGE, so press ● to display
the CHANGE W.P Screen.
4. Use K and L to move the cursor to the
new waypoint you want to use, and then
press ●.
5. On the CHANGE? confirmation screen that
appears, use K and L to move the
cursor to YES, and then press ● to change
the waypoint you selected in step 1 and
return to the Route Plan Screen.
• To cancel the change operation without
changing anything, move the cursor to NO
in the above step, and then press ● to
return to the Route Plan Screen.
L
(About 2 seconds)
L
L
K
L