


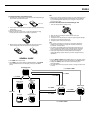


2240-4
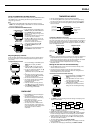
Using the FUNCTION and MENU Screens
Many of the operations of this watch are performed using FUNCTION screens
and a MENU screen. The following describes the general procedures for
using each type of screen.
Note
• The contents of the FUNCTION Screen depend on whether you press
MENU in the Timekeeping Mode or GPS Mode. The contents of the MENU
Screen are always the same.
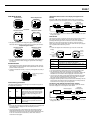
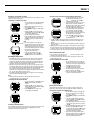
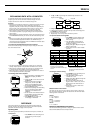
To use the FUNCTION and MENU Screens
• In the Timekeeping or GPS Mode, press
MENU to display the FUNCTION Screen.
• Press MENU while the FUNCTION
Screen is on the display to change to the
MENU Screen.
• The currently selected screen item is the
one where the cursor is located.
• Use K and L to move the cursor. The
menu scrolls automatically if all the items
do not fit on a single screen.
• To select the screen item where the
cursor is currently located, press ●.
• Use MODE or MENU to back track
through menus.
• To return to the Timekeeping Mode, hold
down MENU for about one second.
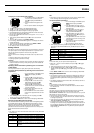
Adjusting Display Contrast
Certain electrical characteristics of the watch may cause a rainbow effect on
the LCD. If this happens, use the following procedure to adjust contrast for
easy reading.
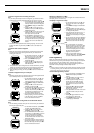
To adjust display contrast
1. In the Timekeeping or GPS Mode, press
MENU twice to display the MENU
Screen.
2. Use K and L to move the cursor to
SET UP, and then press ● to select it.
3. On the next screen that appears, use K
and L to move the cursor to
CONTRAST, and then press ● to select
it.
4. Press K to increase contrast (making
the screen darker) and L to decrease it
(making the screen brighter).
• You can set contrast to one of 15 levels.
• The current contrast setting is indicated
by the value that flashes on the
CONTRAST Screen.
5. After the contrast is the way you want,
press ● to return to the SET UP Screen.
6. Press MODE or MENU twice to return to
the Timekeeping or GPS Mode.
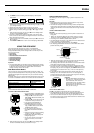
BACKLIGHT
• Press LIGHT to illuminate the display for
about two seconds.
• The electro-luminescent (EL) panel that
illuminates the display loses illuminating
power after very long use.
• Illumination may be hard to see when
viewed under direct sunlight.
• The watch may emit an audible sound
whenever the display is illuminated. This
is due to vibration of the EL panel used for
illumination, and does not indicate
malfunction.
Cursor
Cursor
FUNCTION Screen
L
MENU Screen
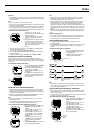
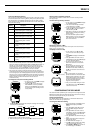
TIMEKEEPING MODE
• Use the Timekeeping Mode to view the current time and date.
• The Timekeeping Mode uses a split screen format with an upper display
area for the time and date, and a lower display area for other information.
• You can directly enter the Timekeeping Mode by holding down MENU for
about one second.
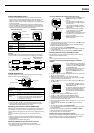
Timekeeping Mode Screen Format
The split screen format of the Timekeeping Mode shows the current date and
time in the upper display area. You can use the lower display area to display a
Position Screen (latitude and longitude) or a Stopwatch Screen. Press L in
the Timekeeping Mode to toggle the lower display area between the Position
Screen and Stopwatch Screen.
Position Screen Stopwatch Screen
Note
• Following a GPS measurement, the Position Screen shows the latitude and
longitude produced by the measurement. After you charge the watch’s
battery when it goes dead or perform an area select operation, the Position
Screen shows the latitude and longitude of the area setting.
• For more information about the Stopwatch Screen, see “Using the
Stopwatch Screen”.
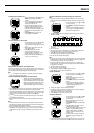
Setting the Current Time and Date Manually
• Use the MENU Screen to set the current time and date manually, and to
reset the second’s count to zero.
• This watch also has a feature that sets the current time and date
automatically, based on GPS measurement data. See “Using Auto Time
and Date Adjustment” for more information.
To set the current time and date manually
1. In the Timekeeping or GPS Mode, press
MENU twice to display the MENU
Screen.
2. Use K and L to move the cursor to
SET UP, and then press ●.
3. Use K and L to move the cursor to
TIME, and then press ●.
• This displays the current date and time
setting, with the seconds digits flashing.
4. Use MODE to move the flashing around the settings on the display in the
sequence shown below.
Seconds Hour Minutes 12H/24H
Day Month Year
5. While the hour, minutes, year, month, or day setting is selected (flashing),
use K (+) and L (–) to change it.
• Holding down either button changes the setting at high speed.
• While the 12H/24H setting is selected, press K or L to toggle it between
24-hour timekeeping (24H) and 12-hour timekeeping (12H). The AM/PM
indicator appears on the display when 12-hour timekeeping is selected.
6. After everything is the way you want, press ● to exit the Setting Screen
and return to the SET UP Screen.
7. To exit the SET UP Screen, press MODE or MENU.
• If the message “NOW EXECUTING” appears on the display, wait until the
message disappears.
8. To return to the Timekeeping or GPS Mode, press MODE or MENU.
Current date
(year, month, day)
Current time
(hour, minutes, seconds)
Day of the week
AM/PM indicator
Latitude
Longitude
Press L.
J
J
Position data
type indicator
L