


2240-6
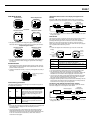
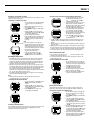
5. Use MODE to move the flashing around the display in the sequence
shown below.
Hour
Minutes
HOUR SIG
ON/OFF
Daily alarm
ON/OFF
6. While the hour or minutes digits are selected (flashing), use K (+) and L
(–) to change the setting.
• Holding down either button changes the setting at high speed.
• While the daily alarm ON/OFF setting or HOUR SIG (Hourly Time Signal)
ON/OFF setting is selected (flashing), press K or L to toggle it on and
off.
7. After everything is the way you want, press ● to exit the Setting Screen
and return to the ALARM SET Screen.
• The alarm on indicator at the bottom of the display is on when the daily
alarm is turned on, and the Hourly Time Signal on indicator is on when the
Hourly Time Signal is turned on.
8. Confirm that the cursor is next to DONE, and then press ● to return to the
SET UP Screen.
9. Press MODE or MENU twice to return to the Timekeeping or GPS Mode.
USING THE GPS MODE
This section describes operations you perform in the GPS Mode.
Before actually performing GPS measurements, you need to make the
settings listed below. Many of these settings need to be made only the first
time you use the watch.
• Area setting
• Datum setting
• GPS measurement mode selection
• Landmark registration
• Route plan registration
• Destination definition
• Time and date setting
Important!
• The Timekeeping Mode time and date settings (including the DST setting),
as well as information about your current location (AREA setting) are used
to determine the current positions of satellites. Make sure that these
settings are always correct, and accurate.
GPS Measurement Modes
You can select from among three different GPS measurement modes. The
mode you should select depends on how quickly you want your position data
updated balanced against how important it is for you to conserve remaining
battery power.
Remember, however, that no matter which GPS measurement mode you use,
it can take a considerable amount of time to achieve the first measurement.
Note
• The initial default GPS measurement mode is ONE SHOT.
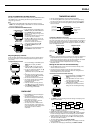
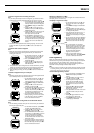
To select a GPS measurement mode
1. In the Timekeeping or GPS Mode, press
MENU to display the FUNCTION Screen.
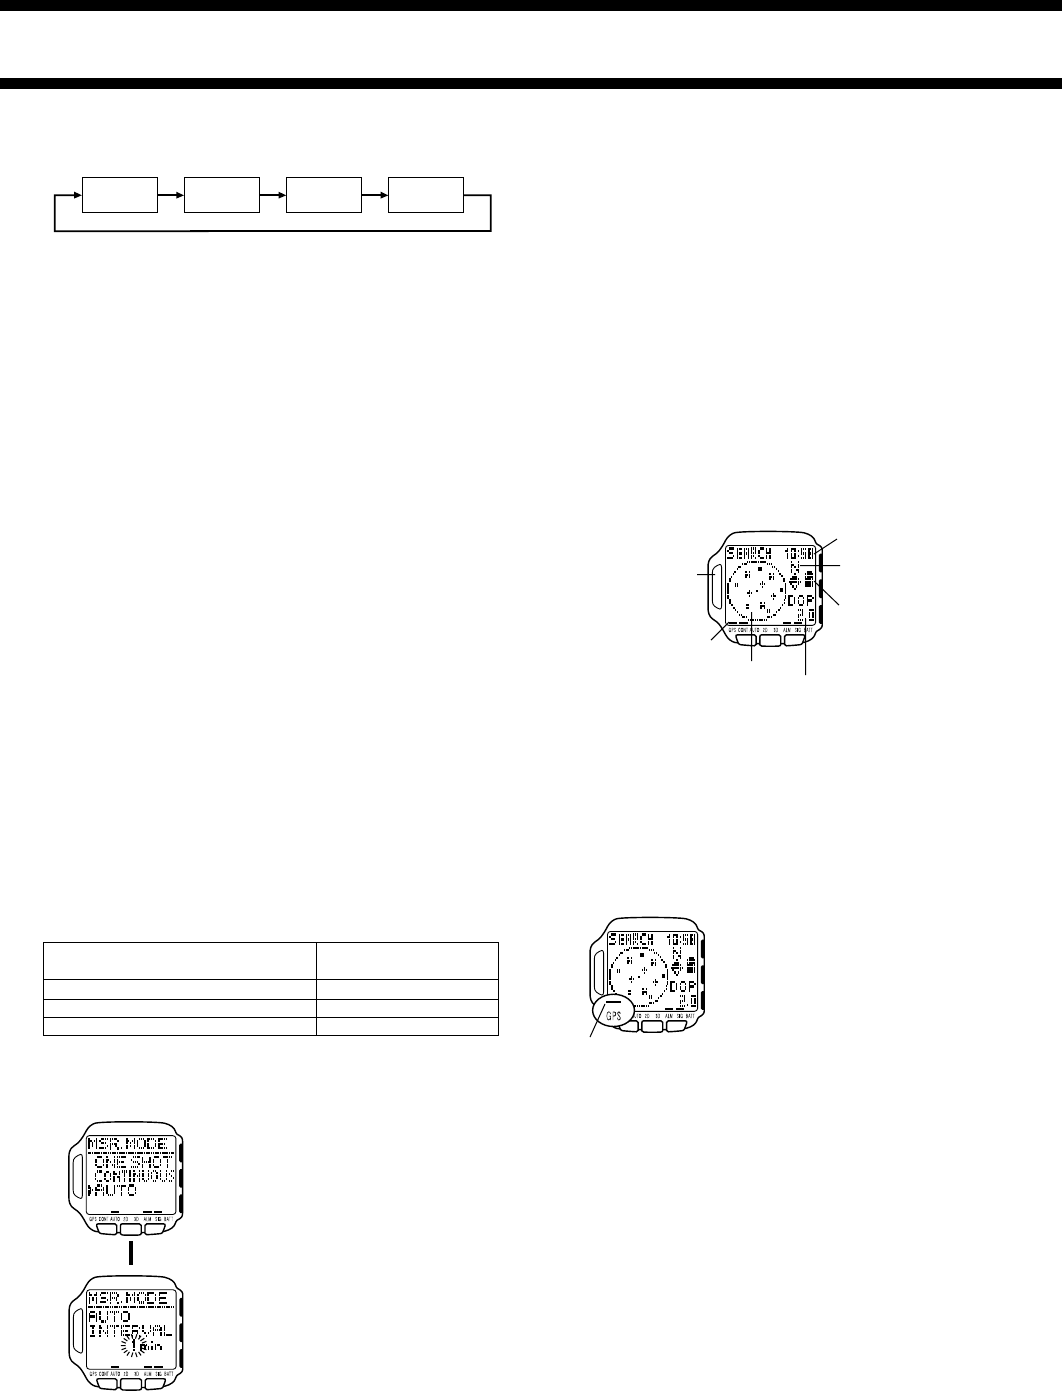
2. Use K and L to move the cursor to
MSR. MODE (Measurement Mode), and
then press ●.
3. Use K and L to move the cursor to the
measurement mode you want to use.
• If you want to select ONE SHOT or
CONTINUOUS here jump to step 6.
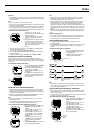
4. If you selected AUTO in the previous
step, press ● to advance to the AUTO
INTERVAL Setting Screen.
• Use this screen to specify how often
AUTO Mode measurements should be
taken.
5. While the interval time setting is flashing,
use K (+) and L (–) to change it.
• Holding down either button changes the
setting at high speed.
• You can set an interval in the range of 1
minute to 60 minutes, in one-minute
steps.
6. After everything is the way you want, press ● to exit the Setting Screen
and return to the Mode Screen you started from in step 1.
Taking a GPS Measurement
The following are the basic steps for taking a position measurement in the
GPS Mode.
Important!
• GPS measurements may take a long time to complete or may even be
impossible due to satellite and other conditions.
• The DOP value setting can influence how long it takes to complete GPS
measurements. See “DOP Values” for details about the DOP value, and
“Changing the DOP Value” for information about how to change the DOP
setting.
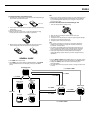
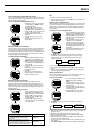
To take a GPS measurement
Important!
• Make sure the antenna is pointing up at the sky while a measurement is
taking place.
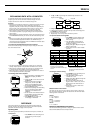
1. While in the Timekeeping Mode with the Position Screen in the lower
display area or while a GPS Mode Screen is on the display, press ●.
• This changes to the SEARCH (Satellite Search) Screen.
• The GPS indicator at the bottom of the display turns on to indicate that the
watch is searching for overhead satellites.
• To interrupt an ongoing GPS measurement, press ● again.
• See “Displaying GPS Satellite Information” for information about satellite
position and battery marks.
2. When the measurement is successful, the watch emits high-pitch beeps
and returns to the Mode Screen you started from in step 1.
• See “Adding a New Landmark to the Landmark List” for information about
storing GPS measurement data in landmark memory.
• If the watch is unable to successfully complete the measurement within
about two minutes, it emits five beeps and displays TIMEOUT at the top of
the display to let you know. If this happens, press MODE or L to return to
the Mode Screen you started from in step 1, move to a more open area,
and try again.
• If you perform the above GPS measurement operation within the area
defined by 20° to 46° north latitude and 122° to 149° east longitude, a
successful measurement causes a map of Japan to appear on the display
for a few seconds after the GPS measurement.
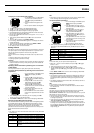
Important!
• When the GPS indicator at the bottom of
the display is on, it indicates that the GPS
circuit is activated, which consumes
valuable battery power. To prolong battery
life, be sure to use the operations
described below to turn off the GPS circuit
when you are not using it.
To turn off the GPS circuit
Press ● to stop position measurement and turn off the GPS circuit.
• The GPS indicator turns off at this time to indicate that the GPS circuit is
off. No GPS measurements are taken while the GPS indicator is off.
• You must turn the GPS circuit back on using the procedures described in
the previous section in order to take GPS measurements. The GPS circuit
is on when the GPS indicator is on.
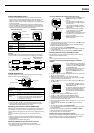
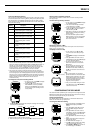
ONE SHOT
CONTINUOUS
AUTO
Single measurement
Continuous measurements every second
Multiple measurements at a preset intervals
To perform this type of measurement:
Use this GPS
measurement mode:
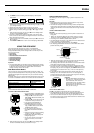
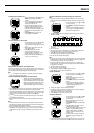
Antenna
GPS indicator
Satellite positions
DOP value
Current time
North Up indicator
Battery mark
L
GPS indicator