


2240-5
Important!
• The GPS Mode of this watch uses the time and date setting to determine
the current positions of satellites. Make sure that your time and date setting
is always accurate.
Note
• The year can be set in the range of 2000 to 2039.
• The day of the week is displayed automatically in accordance with the date
(year, month, and day) settings.
• The watch’s built-in full automatic calendar makes allowances for different
month lengths and leap years. Once you set the date, there should be no
reason to change it except after you charge the battery when it goes dead.
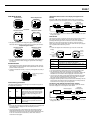
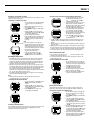
To reset the seconds count to zero
1. Perform steps 1 through 3 of the
procedure under “To set the current time
and date manually”.
2. While the seconds digits are selected
(flashing), press K to reset them to
zero.
• Pressing K while the seconds count is in
the range of 30 to 59 resets it to 00 and
adds 1 to the minutes. If the seconds
count is in the range of 00 to 29, pressing
K resets it without changing the
minutes.
3. After everything is the way you want, press ● to exit the Setting Screen
and return to the SET UP Screen.
4. To exit the SET UP Screen, press MODE or MENU.
• If the message “NOW EXECUTING” appears on the display, wait until the
message disappears.
5. To return to the Timekeeping or GPS Mode, press MODE or MENU.
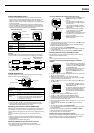
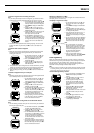
Changing the Summer Time Setting
Turning on summer time, which is also known as Daylight Saving Time
(DST), automatically advances the current time setting by one hour. Note that
summer time is used in certain geographic areas, and may or may not apply
in your area.
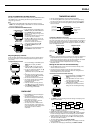
To change the summer time setting
1. In the Timekeeping Mode, press MENU
to display the FUNCTION Screen.
2. The cursor should already be located
next to D.S.T., so press ●.
3. Use K and L to move the cursor to
ON or OFF.
4. Press ● to exit the Setting Screen and
return to the Timekeeping Mode Screen.
• The DST indicator is on while summer
time is turned on.
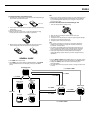
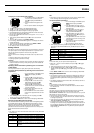
Using Auto Time and Date Adjustment
• Data obtained by a GPS measurement includes the current time and date.
You can set up the watch so it uses this data to adjust the Timekeeping
Mode’s current time and date settings automatically whenever you perform
a GPS measurement operation.
• Before using the automatic setting procedure described below, be sure to
configure the GPS Mode (see “USING THE GPS MODE”).
Note
• You can turn automatic time and date adjustment on or off. The initial
default setting is “ON”.
• Turn off automatic time and date adjustment when you do not want the
time and date settings adjusted by GPS measurement data.
To turn auto time and date adjustment on and off
1. In the Timekeeping or GPS Mode, press
MENU twice to display the MENU
Screen.
2. Use K and L to move the cursor to
SET UP, and then press ●.
3. Use K and L to move the cursor to
AUTO TIME ADJ, and then press ●.
4. Use K and L to move the cursor to
ON or OFF.
5. After the setting is the way you want,
press ● to exit the AUTO TIME ADJ
Screen and return to the SET UP
Screen.
6. Press MODE or MENU twice to return to
the Timekeeping or GPS Mode.
Note
• Date and time data sent from GPS satellites normally does not include
adjustments for leap seconds. GPS satellites do, however, send leap
second adjustment data once every 12.5 minutes.
• Using only GPS date and time measurement data (without leap second
data) to adjust the current Timekeeping Mode settings can eventually
cause the settings to go wrong. The most accurate time settings are
obtained by configuring the watch for continuous GPS measurement, and
allowing the measurement operation to continue for at least 12.5 minutes.
This ensures that at least one set of leap second data will be used for the
setting.
• Note that auto time and date adjustment is possible only when there are
fewer than 512 weeks between the watch’s setting and the actual current
date.
What is a leap second?
• The rotation of the Earth is not always as perfect as the operation of the
atomic clocks used for measuring standard time. Leap seconds can be
added as required to correct for discrepancies between the two.
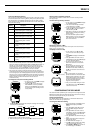
Using the Stopwatch Screen
• The Stopwatch Screen appears in the lower display area in the
Timekeeping Mode.
• The Stopwatch Screen lets you measure elapsed time, split time, and two
finishes. The range of the stopwatch is 23 hours, 59 minutes, 59.99
seconds.
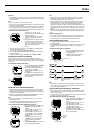
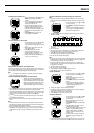
To measure times with the stopwatch
1. In the Timekeeping Mode, press L to
display the Stopwatch Screen in the
lower display area.
2. Use ● and K to perform stopwatch
operations as described below.
Elapsed Time
Split Time
Two Finishes
Note
• Once you start a stopwatch measurement operation, it continues until you
stop it, even if you change the lower display area to the Position Screen or
if you exit the Stopwatch Screen.
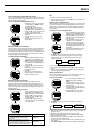
Using the Daily Alarm and Hourly Time Signal
• Setting a daily alarm time causes a beeper to sound at that time for about
20 seconds each day, as long as the daily alarm is turned on. Press any
button to stop the alarm.
• The watch also has an Hourly Time Signal that beeps for about one second
every hour on the hour when turned on.
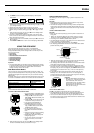
To set the daily alarm and Hourly Time Signal
1. In the Timekeeping or GPS Mode, press
MENU twice to display the MENU
Screen.
2. Use K and L to move the cursor to
SET UP, and then press ●.
3. Use K and L to move the cursor to
ALARM, and then press ●.
4. Use K and L to move the cursor to
TIME ALM, and then press ●.
• This displays the current alarm time with
the hour setting flashing.
L
DST
indicator
Start Stop Re-start Stop Clear
Split releaseStart Split Stop Clear
Start Split
First runner
finishes.
Stop
Second runner finishes.
Record time of first
runner.
Split release
Record time of
second runner.
Clear
●
KK
KK
K
●● ●
●
●
KK
KK
K
KK
KK
K
●
KK
KK
K
KK
KK
K
●
KK
KK
K
KK
KK
K
Alarm time
Hours
Minutes
Seconds
1/100 Second
L
Alarm on indicator
Hourly Time
Signal on
indicator