


8
S T E P
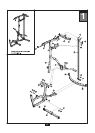
1
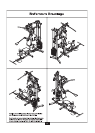
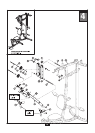
Be careful to assemble all components in
the sequence they are presented.
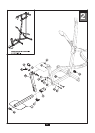
A. Attach Stabilizing Leg (P) to the Lower Main Frame (A) as shown using:
One 98 (10mm x 110mm hex head bolt)
Two 101 (10mm washer)
Two 94 (pulley spacer)*
One 70 (10mm nylon lock nut)
*NOTE:
The Pulley Spacers fit into the Lower Main Frame. You will be installing a pulley in Step 11,
so please only finger tighten hardware.
B. Attach Lower Main Frame (A) to Rear Leg (B) and Rear Upright (C) using:
Two 55 (10mm x 65mm hex head bolt)
Two 70 (10mm nylon lock nut)
C. Attach Upper Main Frame (D) to Lower Main Frame (A) using:
Two 98 (10mm x 110mm hex head bolt)
Four 60 (10mm washer)
Two 70 (10mm nylon lock nut)
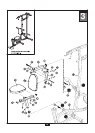
E.
Attach Function Training Arm (H) as shown using:
Two 55 (10mm x 65mm hex head bolt)
Four 60 (10mm washer)
Two 70 (10mm nylon lock nut)
F.
*NOTE:
These parts might be pre-installed.
G.
H.
Attach one End Cap (17)* to Lower Main Frame (A) as shown.
Attach one End Cap (17)* to Upper Main Frame (D) as shown.
Attach two End Caps (17)* to Rear Upper Beam (E) as shown.
Attach two Foot Caps (46)* to Stabilizing Leg (P) as shown.
Attach two Foot Caps (46)* to Rear Leg (B) as shown.
D. Attach Upper Main Frame (D) to Rear Upper Beam (E) and Rear Upright (C) using:
Two 55 (10mm x 65mm hex head bolt)
Two 70 (10mm nylon lock nut)
Attach Upper Main Frame (D) to Rear Upright (C) and Pulley Bracket (AD) using:
Two 55 (10mm x 65mm hex head bolt)
Two 70 (10mm nylon lock nut)
You can now wrench tighten all bolts and nuts in this step.
Leave all pulley bolts hand tight until the final cable installation in Step 13 is completed.
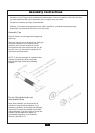
0 10 20 30 40 50 60 70 80 90 100 110 120 130 140 150
0 1 2 3 4 5 6
MM
Inch