


18
S T E P
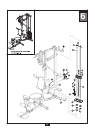
6
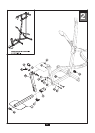
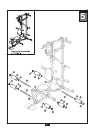
Be careful to assemble all components in the
sequence they are presented.
NOTE:
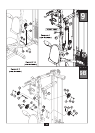
At this point you must make sure that the gym is level, stable and in the right location.
B. Place two Weight Stack Risers (F)* and two Rubber Donuts (29) onto Rear Leg (B) as shown.
Slide two Guide Rods (G) through the Rubber Donuts (29), through the two Weight Stack
Risers (F), and into the Rear Leg (B).
*NOTE:
Use Weight Stack Risers (F) for a 160lb. weight stack.
Do NOT use Weight Stack Risers (F) for a 210lb. weight stack.
C. Slide Weight Stack Plates (88)* onto Guide Rods (G). Make sure the opening in each Weight
Stack Plate (88), for the Weight Stack Pin (30), is facing outward.
*NOTE:
Use twenty 10lb. plates for a 210lb. weight stack.
D. Connect Top Plate (36) to the Selector Rod (31) using:
One 64 (10mm spring lock washer)
E. Slide Top Plate (36) and Selector Rod (31) onto Guide Rods (G).
F. Slide two Shaft Collars (32) onto the two Guide Rods (G) as shown.
G.
H.
I.
Insert Guide Rods (G) into Rear Upper Beam (E). Tighten the two Allen Screws (8) in the Shaft
Collars (32) after placing them into position.
One 35 (10mm x 45mm allen head bolt)
Use fifteen 10lb. plates for a 160lb. weight stack.
You can now wrench tighten all bolts and nuts in this step.
Thread Selector Rod Top Bolt (34) to Selector Rod (31) using:
One 71 (jam nut)
One 63 (spring lock washer)
Leave all pulley bolts hand tight until cable installation in Step 13 is completed.
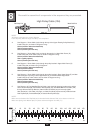
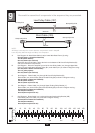
0 10 20 30 40 50 60 70 80 90 100 110 120 130 140 150
0 1 2 3 4 5 6
MM
Inch
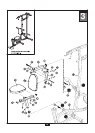
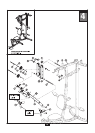
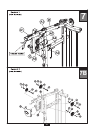
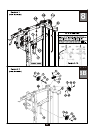
A.
Attach Pulley Bracket Assembly (AC) to Rear Upright (C) as shown using :
Two 55 (10mm x 65mm allen head bolts)
Four 60 (10mm washer)
Two 70 (10mm nylon lock nut)