


14
S T E P
4
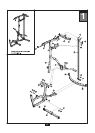
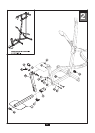
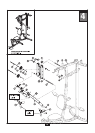
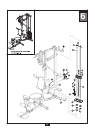
Be careful to assemble all components in
the sequence they are presented.
A. Attach Press Arm Pivot (Q) to Upper Main Frame (D) as shown using Shaft (16) and:
Two 99 (10mm x 20mm allen head bolt)
Two 101 (10mm washer)
Two 100 (bronze bushing)
Tighten the two Allen Screws (8) in the Upper Main Frame(D)
B.
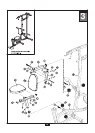
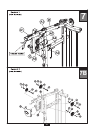
Attach Right Handle (S)* and Left Handle (T)* to Press Arm (R) as shown using for each handle:
One 51 (10mm x 60mm allen head bolt)
One 70 (10mm nylon lock nut)
Attach Press Arm (R) to Press Arm Pivot (Q) as shown using Shaft (5) and Steel Bushings (6)*.
Tighten the two Allen Screws (8) in Press Arm (R).
Attach Rubber Stop (19) and Jam Nut (47) as shown into Upper Main Frame(D)
C.
*NOTE:
To identify the difference between left and right: notice in the picture in Step 4 the horizontal grips point
out ward, and the smaller grip is angled toward the front of the gym.
*NOTE:
These parts might be pre-installed.
*NOTE:
These parts might be pre-installed.
*NOTE:
Leave the two bolts (50) hand tight.
You will need to install a shroud after cable installation in Step 7.
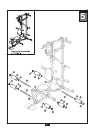
D.
Install two 110mm diameter Pulleys (4) into Press Arm Pivot (Q) as shown using:
Two 50 (10mm x 215mm allen head bolts)*
Four 3 (pulley spacer)
Four 60 (10mm washer)
Two 70 (10mm nylon lock nut)
E
F
You can now wrench tighten all bolts and nuts in this step. Do NOT re-tighten any of the pad bolts.
Leave all pulley bolts hand tight until the cable installation in Step 13 is completed.
Insert End Caps (1)* to Press Arm Pivot (Q) as shown.
Insert End Caps (7)* to Press Arm (R) as shown.
Insert Round Pop Pin (13)* to Press Arm (R) as shown.
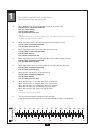
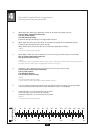
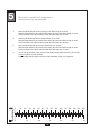
0 10 20 30 40 50 60 70 80 90 100 110 120 130 140 150
0 1 2 3 4 5 6
MM
Inch