


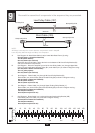
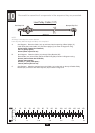


32
S T E P
133
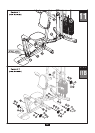
Be careful to assemble all components in the sequence they are presented.
NOTE:
All Pulleys in this step are 90mm diameter.
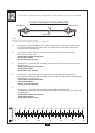
0 10 20 30 40 50 60 70 80 90 100 110 120 130 140 150
0 1 2 3 4 5 6
MM
Inch
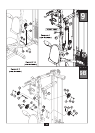
A.
See Diagram 1. Route Cable(106) down through the lower bracket of Pulley Bracket Assembly (AC).
See Diagram 2. Insert Pulley (D5), over Cable (106) and into the lower bracket of Pulley Brackets
Assembled (AC) as shown using:
B. See Diagram 1. Route Cable (106) up through Double Pulley Bracket (AF) and round pre-installed
Pulley (D6) as shown.
One 53 (10mm x 45mm hex head bolt)
Two 60 (10mm washer)
One 86 (“L” pulley cable plate)
One 70 (10mm nylon lock nut)
One 53 (10mm x 45mm hex head bolt)
Two 60 (10mm washer)
One 86 (“L” pulley cable plate)
One 70 (10mm nylon lock nut)
C.
D.
E.
F.
See Diagram 1. Route Cable (106) down to the upper bracket of Pulley Bracket Assembly (AC).
See Diagram 2. Install Pulley (D7), over Cable (106) and beside the upper bracket of Pulley Bracket
Assembly (AC) as shown using:
See Diagram 2. Install Pulley (D8), over Cable (106) and into Function Training Arm (H) as shown using:
One 58 (10mm x 50mm hex head bolt)
Two 60 (10mm washer)
One 70 (10mm nylon lock nut)
One 58 (10mm x 50mm hex head bolt)
Two 60 (10mm washer)
One 70 (10mm nylon lock nut)
See Diagram 1. Route Cable (106) through Function Training Arm Pulley Bracket (AE).
See Diagram 2. Install Pulley (D9), under Cable (106) and into Training Arm Pulley Bracket (AE) as
shown using:
See Diagram 1. Route Cable (106) into and through Function Training Arm (H).
You can now wrench tighten all the bolts and nuts. Do NOT re-tighten any of the pad bolts.
5900 mm
Small Ball End Small Ball End
Function Training Arm Pulley Cable(106)
Leave all pulley bolts hand tight until Step 13 is completed.