


Page 60
PARTS REMOVAL AND REPLACEMENT
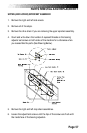
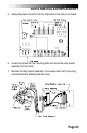
6. Unplug the white plastic connector labeled J1 on the relay assembly
circuit board.
7. Cut the four tyraps on the vertical support.
8. Remove the main cable from the frame.
9. To reinstall, place the main cable into the wire saddles. Reattach the cable
to the vertical support with four tyraps.
10. Plug the white plastic connector of the main cable into the relay assembly
circuit board at the spot labeled J1.
11. Plug the console cable into the back of the console. Reattach the console
to the handrail mount. Plug the connectors together at the main cable/
console cable junction.
12. Reinstall the right side cover. Reconnect the DC power cable.
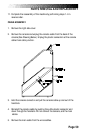
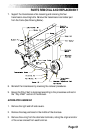
TRANSMISSION ASSEMBLY
1. Remove the left and right side covers.
2. Remove the step positioned in the middle of the staircase.
3. Remove the drive chain.
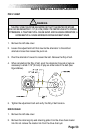
4. Remove the Poly-V belt. Inspect the belt for wear. Replace the belt if it is
cracked, worn, torn, or cut.
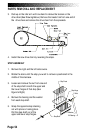
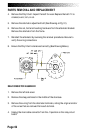
5. Remove the transmission bracket by loosening and removing the
mounting hardware on the alternator and the transmission.
6. Remove the transmission brace by loosening and removing the mounting
hardware from the transmission and the frame.