


Page 58
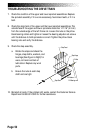
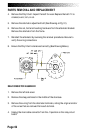
PARTS REMOVAL AND REPLACEMENT
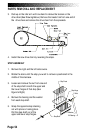
7. Have an assistant support the sprocket assembly. Loosen and remove the
nuts on the pillow block bearing housing.
8. Remove the sprocket assembly from the frame.
9. Loosen the two set screws on both of the pillow block bearing collars and
remove the pillow block bearings from the sprocket axle.
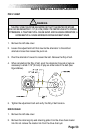
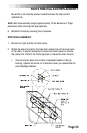
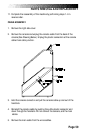
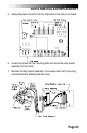
10. To reinstall the sprocket assembly:
• Slide the pillow block bearings on both ends of the sprocket axle. Do
not tighten the set screw on the pillow block bearing collars yet.
• Place the bearing adjusters and the sprocket assembly onto the frame
and start the pillow block bearing housing nuts onto the frame.
• Slide the sprocket assembly toward the front of the machine while
tightening the pillow block bearing housing nuts.
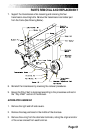
• Align the sprocket assembly. The outside face of the left sprocket
should be 1-11/16" (4.3 cm) from the outside edge of the left frame
rail. Move the sprocket axle within the pillow block bearing collar as
needed to get the correct distance.
• When the distance is correct, tighten the pillow block bearing collar
set screw on the left and right sides of the machine.
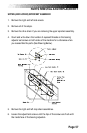
• Loosen the pillow block bearing housing nuts slightly. Tighten the
bearing adjuster set screws until the exact number of threads are
exposed (refer to your notes taken earlier). Tighten the pillow block
bearing housing nuts.
• Check the alignment of the other sprocket at this time. If the distance
from the outside edge of the left frame rail to the outside face of the
sprocket is not 1-11/16" (4.3 cm), loosen the set screws on the left
and right side pillow block bearing collars and adjust the axle. Tighten
the pillow block bearing collar set screws on the machine and then go
to step 11.