


10
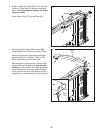
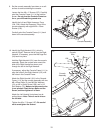
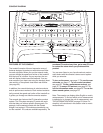
7. With the help of a second person, hold a Screw
Spacer (90) inside the lower end of the Left
Upright (85). Insert an M10 x 95mm Screw (8)
w
ith an M10 Star Washer (9) into the Left Upright
and the Screw Spacer. Repeat this step with a
s
econd Screw Spacer (90), an M10 x 68mm
Screw (114), and an M10 Star Washer (9).
Hold the Left Upright Spacer (86) and the Left
Upright (85) against the Base (95). Tighten the
M10 x 95mm Screw (8) and the M10 x 68mm
Screw (114) until the heads of the Screws touch
the Left Upright; do not fully tighten the Screws
yet.
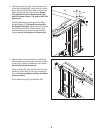
With the help of a second person, tip the treadmill
so that the Base (95) is flat on the floor.
86
85
114
8
95
90
9
7
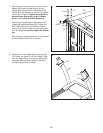
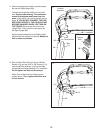
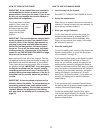
8. Identify the Left and Right Upright Covers (109,
110), which are marked “Left” and “Right.” Slide
the Left Upright Cover onto the Left Upright (85)
as shown. Slide the Right Upright Cover onto
the Right Upright (89) as shown.
109
8
85
89
110