


retailer.
For battery information of the Polar s3+ stride sensor, Polar G5 GPS sensor or Polar G3 GPS sensor
W.I.N.D., consult the user manual for the product in question.
Prior to changing the battery, please note the following:
• The low battery indicator is displayed when 10-15% of the battery capacity is left.
• Before battery change, transfer all data from your RCX3 to polarpersonaltrainer.com to avoid data loss. For
more information, see Data Transfer (page 26).
• Excessive use of the backlight drains the battery more rapidly.
• In cold conditions, the low battery indicator may appear, but will disappear when the temperature rises.
• The backlight and sound are automatically turned off when the low battery indicator is displayed. Any
alarms set prior to the appearance of the low battery indicator will remain active.
Keep the batteries away from children. If swallowed, contact a doctor immediately. Batteries should be disposed of
properly according to local regulations.
Change Batteries Yourself
To change the batteries of the training computer and heart rate sensor yourself, carefully follow the
instructions below:
When changing the battery, make sure the sealing ring is not damaged, in which case you should replace
it with a new one. You can purchase the sealing ring/battery kits at well-equipped Polar retailers and
authorized Polar Services. In the USA and Canada, the additional sealing rings are available at authorized
Polar Service Centers. In the USA the sealing ring/battery kits are also available at www.shoppolar.com.
When handling a new, fully charged battery, avoid clasp-like contact, i.e. simultaneously from both sides,
with metal or electrically conducting tools, like tweezers. This may short circuit the battery, causing it to
discharge more rapidly. Typically, short circuiting does not damage the battery, but it may decrease the
capacity and the lifetime of the battery.
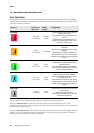
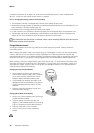
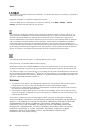
Changing Training Computer Battery
1. Use the battery cap tool to open the battery
cover. Position the tool so that it fits in correctly
on the top of the back cover and turn it from
CLOSE to OPEN. Remove the battery cover.
2. Lift the battery out carefully. Be careful not to
damage the metal sound element or the grooves.
Insert a new battery with the positive (+) side
outwards.
3. Close the cover with the battery cap tool and
re-enter the basic settings.
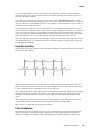
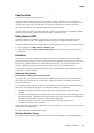
Changing Heart Rate Sensor Battery
1. Using a coin, open the battery cover by turning it
counterclockwise to OPEN.
2. Insert the battery inside the cover with the
negative (-) side outwards. Make sure the sealing
ring is in the groove to ensure water resistance.
3. Press the cover back into the connector.
4. Use the coin to turn the cover clockwise to
CLOSE.
ENGLISH
46 Important Information