


Instruction Manual
748297-E
June 2003
Rosemount Analytical Inc. A Division of Emerson Process Management Startup and Operation 3-3
Model NGA2000 HFID
Noncompliance could cause damage to
the module. At the very least, the mod-
ule's safety system, which requires a
certain volume of purge air flowing
through the case before allowing burner
ignition, will not allow the instrument to
operate. The lowest purge air
flow/pressure setting possible during
burner operation is preferable. Thus, the
user should set the external purge air
pressure initially at 689 hPa-gauge (10
psig). Check the Miscellaneous Control
Parameters screen under Technical Di-
agnostics, and note whether the Purge
Gas (switch) variable is "ON." If it is
"OFF," increase purge air supply by
69 hPa-gauge (1 psig), and recheck the
Purge Gas variable until it reads "ON."
DO NOT EXCEED 1378 hPa-GAUGE
(20 PSIG). If the maximum setting is
reached, and the Purge Gas variable
does not read "ON," contact factory. If
the safety system is initiated success-
fully (Purge Gas variable is "ON"), con-
tinue with the remainder of the startup
procedure.
Note
Do not restrict the PURGE OUT port and
the pressure relief valve. They must be
vented to atmospheric pressure.
12. Manual or Auto-ignite the flame. The
Flame-On green LED should be illumi-
nated.
Two methods of burner ignition are pos-
sible: auto-ignition and manual ignition.
(Note: The burner is easier to ignite
when the oven has reached the desired
setpoint temperature.)
Auto-ignition provides fuel override and
three attempted ignitions (default set-
ting), if necessary.
Before ignition and operation, Fuel Flow
must be set to ON in "Light Flame" dis-
play screen under Basic Controls and
oven temperature must be at least 85°C.
The manual ignition switch on the Ana-
lyzer Module front panel must be ma-
nipulated in the following ways:
• Press up and hold for one minute.
This opens burner fuel and air sole-
noids.
• Press down to ignite burner glow
plug for up to 10 seconds.
• Repeat as necessary (if fuel and air
sources are farther away than 10
feet, several more attempts may be
necessary).
• If the flame has been lit, but the
flame temperature increases slowly,
perform the following steps:
! After igniting flame, release
switch for 2 seconds
! Press switch down for
2 seconds
! Repeat release switch and
press down steps as necessary.
13. Allow the case and oven to warm up,
approximately 1 to 2 hours.
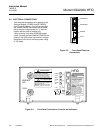
14. Verify that all 4 LEDs are illuminated.
Note the four LEDs on the front panel of
the Analyzer Module. They provide nec-
essary information for either ignition
procedure. The LEDs, when illuminated,
denote the following information:
• Green - unit powered on
• Amber - continuous illumination im-
plies oven has reached operating
temp. Within ±6°C of setpoint
• Green - Flame on
• Green - purge air system intact (it
has filled five volumes of the module
interior)