


GB
9
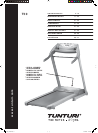
OWNER'S MANUAL • T50
belt is allowed run across to one side for long
periods of time the edges of the belt may be
damaged and the treadmill may not continue to
operate correctly. Any damage to the belt caused
by the lack of necessary adjustment will not be
covered by the warranty.
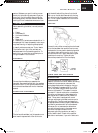
ADJUSTING THE BELT TENSION
The belt must be tensioned if it begins to slip on
the rollers. In normal use, however, keep the belt
as loose as possible! The belt tension is adjusted by
turning the same screws as used for aligning the
running belt. If turning the screws will not effect
the belt tension, please contact your local Tunturi
dealer.
1. Increase the treadmill's speed to 5 km/h (3
mph).
2. Turn both adjustment screws an equal amount,
1/4 turn clockwise.
3. Try to slow the belt down by holding onto the
handrails and braking as you walk (as if you were
walking downhill). If the belt slips, turn another
1/4 turn and repeat the test. When braking heavily
the belt may slip. If the belt keeps slipping despite
repeated adjustments, please contact your local
Tunturi dealer.
MALFUNCTIONS
NOTE! Despite continuous quality control,
defects and malfunctions caused by individual
components may occur in the equipment. In most
cases it's unnecessary to take the whole device in
for repair, as it's usually suffi cient to replace the
defective part. Always give the model, serial
number of your equipment and in case of
malfunctions also conditions of use, nature of
malfunction and any error code.
When you encounter unusual behavior from the
treadmill, simply turn the power switch off, wait 1
minute and turn the power switch on to reset the
treadmill. This should clear incidental errors and
ready the treadmill for normal operation again. If
after you have reset the treadmill by turning the
power switch off and on again, and the treadmill
is still not operational, contact your local Tunturi
dealer for service.
If you require spare parts, always give the model,
serial number of your equipment and the spare
part number for the part you need. The spare part
list is at the back of this manual. Use only spare
parts mentioned in the spare part list.
ERROR CODES
The user interface will display information about
any operational faults.
ERROR 1: speed sensor error. Turn the power
switch off and on again to reset the treadmill. If
treadmill recovers to normal operation, you may
continue to use the treadmill. If treadmill does not
recover to normal operation, then call the dealer
for service.
ERROR 2: over speed error. Call your dealer for
service.
ERROR 3: safety key error. Secure the safety key in
place and continue training.
ERROR 5: Incline motor error.
Turn the power switch off and on again to reset the
treadmill. Press simultaneously -, + and elevation
down keys for automatic self-calibration. Press the
Stop key for 2 seconds to exit. If treadmill recovers
to normal operation, you may continue to use the
treadmill. If treadmill does not
recover to normal
operation, then call the dealer for service.
ERROR 11: Communication error. Turn the power
switch off and on again to reset the treadmill. If
treadmill recovers to normal operation, you may
continue to use the treadmill. If treadmill does not
recover to normal operation, then call the dealer
for service.
OVERLOAD PROTECTOR
If the treadmill’s power consumption becomes
too great, the overload protector will cut the
power supply as a safety measure. The fuse button
next to the power switch will spring up. Before
you continue using the equipment, fi rst check
the lubrication of the track, as well as any other
mechanical reason that could have caused the
overload protector to cut in. Push the fuse button
down. The treadmill is now ready for use again.
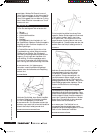
MOVING AND STORAGE
Folding and unfolding of this treadmill is easy.
After the treadmill has come to a complete stop,
ensure that the running deck elevation is 0 %,
unplug the power cord from the wall and the
treadmill. Fold up the deck; when you hear a click,
the deck is locked in place. The lock release handle
is on the left-hand side of the rear support. Release
the running track lock by pulling the handle down.
To release the folding lock, support the deck with
your right hand while you release the lock with
your left hand. Deck is ready to be positioned
horizontally on the ground.
NOTE! Please handle with caution although it is
designed with the gas cylinder taking most of the
weight off the deck.
Before moving T50, be sure the power cord is
unplugged from the wall and the treadmill. Fold
up the running deck until it is locked and push the
equipment on the transportation wheels.
Lower the treadmill carefully onto the fl oor.
T50_manual.indd 9T50_manual.indd 9 3.8.2005 11:24:113.8.2005 11:24:11