


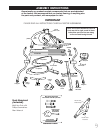


7
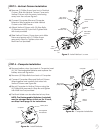
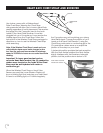
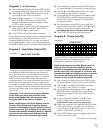
STEP 4 – Computer Installation
a) Remove battery door from back of Computer, insert
(4) “AA” Rechargeable Batteries and replace the
battery door, see Figure 4a.
b) Remove (4) Phillips Bolts from back of Computer.
c) Connect Computer Wires and Vertical Column
Wires together and carefully tuck wires into
Vertical Column, see Figure 4b.
d) Mount Computer to Vertical Column using the
(4) Phillips Bolts removed in Step 4b and tighten
with Multi Hex Tool provided.
e) The Book Holder can be attached at any time.
NOTE: The Rechargeable Batteries (included)
must be charged before initial use for 2 hours,
see Step 9 and page 16 for instructions.
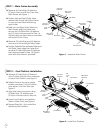
STEP 3 – Vertical Column Installation
a) Remove (1) Phillips Screw from front of Vertical
Column. Slide the Vertical Column Cover onto
Vertical Column with the screw hole facing
away from the unit, see Figure 3.
b) Connect Computer Wire and Computer
Extension Wire together and slide Vertical
Column onto Main Frame.
c) Attach Vertical Column with (3) Allen Bolts,
(3) Washers and (3) Nylon Nuts. Tighten Bolts
with tools provided.
d) Slide Vertical Column Cover down onto Main
Frame and secure with (1) Phillips Screw
removed in Step 3a. Tighten screw with
Multi Hex Tool provided.
Figure 3 - Install Vertical Column
Figure 4a - Install Batteries
Figure 4b - Computer Installation
vertical
column
M4 x 16mm
phillips screw
computer
extension wire
M8 nylon
nut
M8 washer
M8 x 60mm
allen bolt
computer
wire
vertical column
cover
computer
wires
vertical
column
computer
wires
vertical
column
wires
M5 x 10mm
phillips bolts
computer
battery door
computer
main
frame
rechargeable
“AA” batteries
book
holder