


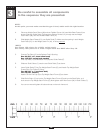


5
Be careful to assemble all components
in the sequence they are presented.
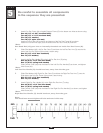
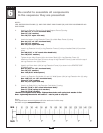
mm
Inch
18
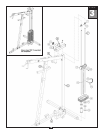
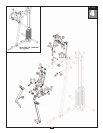
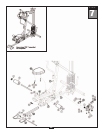
STEP
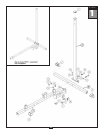
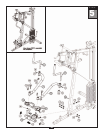
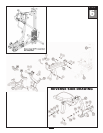
A. Attach Pec Dec Frame (N) to Angled Support Frame (D) in the bottom two holes as shown using:
One 42 (1/2” x 3 3/4” hex head bolt)*
Two 43 (1/2” x 3 1/4” hex head bolt)
Five 73 (1/2” washer)
Two 70 (1/2” nylon lock nut)
Attach two End Caps (15) to the top and bottom of the Pec Dec Frame (N) as shown.
Attach two Convex End Caps (2) to the sides of the Pec Dec Frame (N) as shown.
*Note:
Hex Head Bolt (42) goes into an inter
nally threaded nut inside Pec Dec Frame (N).
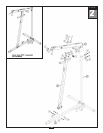
B. Slide Oilite W
asher (26), Left Pec Dec Cam (P) and then the Left Pec Dec Arm (Q) onto the left
side of the Pec Dec Frame (N) as shown, Attach using:
One 37 (1/2” x 3/4” hex head bolt)
One 73 (1/2” washer)
C. Attach Left Pec Dec Handle (R)* to the Left Pec Dec Arm (Q) using:
One 45 (5/16” x 3/4” flat allen head)
One 77 (5/16” spring lock washer)
Slide Chrome Collar (46) onto the bottom of the Left Pec Dec Handle (R) as shown, and tighten
Allen Scr
ew (34).
*Note:
Left Pec Dec Handle (R) should bend out, away from the the gym.
D. Slide Oilite Washer (26), Right Pec Dec Cam (S) and then the Right Pec Dec Ar
m (T) onto the
Right side of the Pec Dec Frame (N) as shown, attach using:
One 37 (1/2” x 3/4” hex head bolt)
One 73 (1/2” washer)
E. Attach Right Pec Dec Handle (U)* to the Right Pec Dec Arm (T) using:
One 45 (5/16” x 3/4” flat allen head)
One 77 (5/16” spring lock washer)
Slide Chrome Collar (46) onto the bottom of the Right Pec Dec Handle (U) as shown, and tighten
Allen Scr
ew (34).
*Note:
Right Pec Dec Handle (U) should bend out, away from the gym.
Note:
You should now wr
ench tighten all bolts and nuts in this step.