


960 Ef Owner’s Manual
5
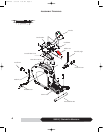
Assembly Instructions
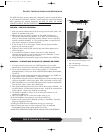
Step 1: Rear Stabilizer Bar
1. Place rear stabilizer bar under rear mainframe and align the screw holes.
2. Insert and tighten these two (M8 x 16mm) screws, split lock washer and flat
washers using 6mm Allen wrench.
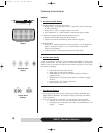
Step 2: Console Mast Assembly
1. Slide console mast cover onto console mast, making sure it is facing the right
direction.
2. Connect the plug to the plug receptor of the main wire harness inside the
console mast, taking care to install correctly. (See plug alignment marks)
3. Install the console mast by carefully sliding it onto the console mast receptor
while pulling the wire harness. This will keep the slack out of harness so
that the wires will not pinched and short out.
HINT
: Pay attention on the wire harness while sliding the console mast and
do not pinch the wire harness. Fail to do so will result a void warranty.
4. Insert the four screws (M8 x 16mm), spring washer and washers into console
mast and hand tighten them. Note: do not tighten them until you have all 4
sets of screws, split lock washers and flat washers inserted. Finally, tighten all
of them with attached 6mm Allen wrench.
5. Place console mast cover in place and align it with snap holes. Snap the con
sole mast cover into main side cases, making sure all snaps are in place.
6. Insert and tighten console mast cover with two screws (M5 x 12mm) using a
Phillips screwdriver.
7. Peel the rubber mats and place them on the accessory trays.
Step 3: Handlebar Assembly
1. Insert the hand pulse harness through the opening of the console mast and
out the top of the console mounting plate.
2. Assemble the handlebar onto the mount and insert and tighten four screws
(M6 x 12mm), split lock washers and flat washers using 4mm Allen wrench.
Be sure not to pinch the hand pulse wire harness during this procedure, as
this will damage the electronic console.
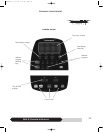
Step 4: Console Assembly
1. Un-tighten the main wire harness on the console mast. Connect both plugs to
the plug receptors on the backside of the console, taking care to install
correctly (see plug alignment marks).
WIRING HARNESS INSTALLATION HINT: Any excess wiring must be carefully
inserted (stored) back into console mast before installing the console onto the
console mounting plate.
2. Fasten the console to the console mounting plate with four (M5 x 12mm)
screws using a Phillips screwdriver.
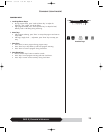
Step 5: Handrail Assembly
1. Insert Right handrail (See “R” mark on the mounting plate) into handrail
receptor and align the screw holes of two mounting plates.
2. Insert and tighten four (M6 x 12mm) screws, split lock washers and flat
washers with attached 4mm Allen wrench.
3. Install the handrail cover by tighten two (M5 x 8mm) screws using a Phillips
screwdriver. Make sure the oblong opening is facing up and on the handrail
side.
4. Repeat this assembling process for the Left handrail and its cover.
Step 6: Transformer Assembly
1. Place the elliptical equipment on a solid, leveled floor.
2. Plug the transformer into plug receptor located on the front/bottom side of
the main frame.
3. Plug the transformer into power outlet.
NOTE: Be sure to use right transformer for your power outlet; 110V or 220V.
960OM-rev1 5/31/06 7:23 AM Page 9