


26
Beeper test
The beeper test will cause the beeper to sound.
1. In the Diagnostics menu, select the “BEEPER TEST” and accept it by pressing the JustGo
TM
/ENTER key.
Listen for a series of “beeps”. The beeper test will stop automatically when you press the CLEAR/STOP key.
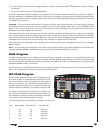
Heart Rate Test
The heart rate test allows you to determine if the heart rate system (chest strap or hand grip) is working properly and that
the computer is displaying your heart rate signal during a program.
1. In the Diagnostics menu, select the “HEART RATE TEST” and accept it by pressing the JustGo
TM
/ ENTER key.
2. The top left display will show the signal received from the chest strap and the bottom window will show the hand grip
signal. Attach your heart rate chest strap. You do not need to step on the treadmill for this test, but simply stand near
the computer. Within a few seconds, your actual heart rate signal will be displayed on the screen. Do the same for the
hand grip system; put your hands on the two metal plates and wait for 10 to 15 seconds.
3. Press the CLEAR/STOP key to terminate the test.
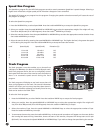
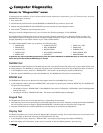
Belt Alignment
Should you need to adjust the tracking of the
running belt, you must make all adjustments during
the BELT ALIGNMENT procedure. To determine if
the belt is not aligned along the center of the deck,
measure the visible deck surface on both left and
right sides of the belt. If these values are nearly
equal, do not adjust the belt. If one side of the belt
is closer to the foot rests than the other side, then
you will need to adjust the belt to track to the
opposite side.
NOTE – Your treadmill will need belt alignment
especially during the first 24 hours of use because
the belt stretches itself during that time. After the
first 24 hours, no more adjustment should be
needed.
To adjust running belt alignment.
1. In the Diagnostics menu, select the “BELT ALIGNMENT” and accept it by pressing the JustGo
TM
/ENTER key.
2. Press the JustGo
TM
/ENTER key to proceed.
3. You will need the 5/32” hex key to turn the bolts located inside the rear roller end caps.
WARNING – Do not stand on the belt during this procedure. Keep loose clothing and long hair away from the belt and
rollers when performing belt alignment.
4. Allow the belt to reach 2.0 mph or 3.2 km/h (speed will be displayed on the computer screen). Looking from the rear
of the treadmill, notice the gap between left and right sides of the belt and the foot rests.
If the running belt is tracking to the left of the deck surface:
• turn the left bolt in a clockwise direction to allow the belt to track to the right and ultimately in the center, or;
• turn the right bolt in a counter-clockwise direction to allow the belt to track to the right and ultimately in
the center.
If the running belt is tracking to the right of the deck surface:
• turn the left bolt in a counter-clockwise direction to allow the belt to track to the left and ultimately in the center, or;
• turn the right bolt in a clockwise direction to allow the belt to track to the left and ultimately in the center.
NOTE – During any belt alignment procedure, do not turn each bolt by more than 1 to 1-1/2 revolutions. Exceeding this may
cause a high amount of tension on the running belt and result in premature wear of the belt and rollers. It is best to adjust only
one alignment bolt, since this will prevent the belt from excessive stretching resulting from adjustment of both alignment bolts.
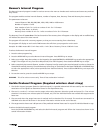
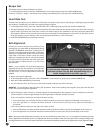
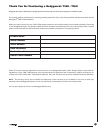
To verify the belt alignment, check visual gap (A) between
belt ends and foot rests (B). Belt alignment bolts (D) are
visible through hole in rear roller caps (C).
D
B
C
A
figure 9