


20
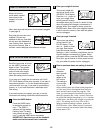
The program will continue until the speed setting
of the last period is shown in the CURRENT PE-
RIOD column of the LED matrix and the TIME dis-
play counts down to zero. The walking belt will
then slow to a stop.
During the program, the speed and incline settings
of the current period can be adjusted with the
SPEED and INCLINE buttons. Adjustments will
not be stored in memory. To reprogram speed
and incline settings, press the LEARN button. The
LEARN indicator will light. Speed and incline set-
tings can be reprogrammed only when the in-
dicator is lit. Next, adjust the speed and incline of
the treadmill with the SPEED and INCLINE but-
tons. When the current period of the program is
completed, the new speed and incline settings will
be stored in memory. When you have repro-
grammed speed and incline settings for as many
periods as desired, press the LEARN button
again.
To stop the program for a moment, press the
STOP button. The displays will pause and the
TIME display will begin to flash. To restart the
program, press the START button or the SPEED
+
button. To end the program at any time, hold
down the STOP button for two seconds. The
MANUAL mode will then be selected.
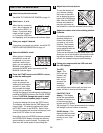
Adjust the cushion level of the walking platform
if desired.
See step 7 on page 13.
Follow your progress with the LED displays.
Refer to step 8 on page 13.
When the program is completed, remove the
key.
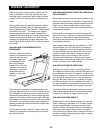
Make sure that the incline of the treadmill is at the
lowest setting. The incline must be at the lowest
setting when the treadmill is folded to the stor-
age position or the treadmill will be damaged.
Remove the key from the console and put it in a
secure place. In addition, move the on/off switch to
the off position and unplug the power cord.
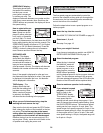
The treadmill console features a workout history mode
that keeps track of the total hours you have exercised,
the miles you have walked or run, the calories and fat
calories you have burned, and your average speed.
The console can display the totals for the previous 7
days or the totals since you last reset the workout his-
tory mode.
Follow the steps below to use the workout history mode:
Enter the current time into the console.
If you have previously entered the current
time, go to step 2.
For the workout history mode to be accurate, the
current time must be entered into the console.To
check the time setting, first hold down the STOP
button while inserting the key into the console.
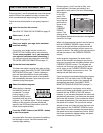
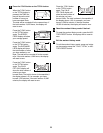
The time setting will ap-
pear in the TIME display.
Note: The console uses a
24-hour clock; if the cur-
rent time is 6:45 pm, the
display should show
18:45.
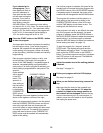
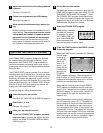
To change the time setting, first press the LEARN
button. The minute digits in the TIME display will
begin to flash. Press the
USER + or Ð button to set
the minute digits to the
correct time. Press the
LEARN button again. The
hour digits will begin to
flash. Press the + or Ð
button to enter the correct
hour. Then, press the
LEARN button again. When the correct time is
shown, remove the key from the console and then
reinsert it. Note: Once the current time is entered,
it will be saved in memory, even when the power
cord is unplugged.
Select user 1, 2, or 3.
See step 2 on page 13.
If the walking belt is moving, press the STOP
button.
To access the workout history mode, the walking
belt must be stopped.
3
2
1
8
7
6
THE WORKOUT HISTORY MODE