


11
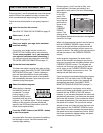
DIAGRAM OF THE CONSOLE
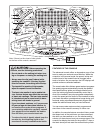
Refer to the drawing at the top of page 10.
A. CUSHION ButtonsÑThese buttons control the firm-
ness of the walking platform. There are 10 different
firmness levels.
B. CUSHION DisplayÑThis display shows the firm-
ness level of the walking platform.
C. ENTER ButtonÑThis button is used to enter age,
weight, and maximum heart rate settings.
D. + and Ð ButtonsÑThese buttons are used to change
age, weight, and maximum heart rate settings.
E. USER ButtonÑThis button is used to select user in-
formation. Up to three different users can store age,
weight, and maximum heart rate settings.
F. QUICK SPEED ButtonsÑThese buttons allow you
to quickly select speed settings.
G. LED DisplaysÑThese displays provide continuous
feedback of calories and fat calories burned,
elapsed time, distance, laps completed, speed and
pace. In addition, the PULSE display shows your
heart rate when the heart rate monitor is worn.
Note: The console can display speed and dis-
tance in either miles or kilometers (see page 14).
For simplicity, all instructions in this manual
refer to miles.
H. LED MatrixÑWhen the manual mode is selected,
this matrix shows your progress on an LED track.
When a workout program is selected, the matrix
shows upcoming speed or incline changes.
I. MANUAL/Program IndicatorsÑThese indicators
show when the manual mode is selected and when
a workout program is selected.
J. SPEED ButtonsÑThese buttons control the speed
of the walking belt. Each time a button is pressed,
the speed will change by 0.1 mph; if a button is held
down, the speed will change in increments of 0.5
mph. The speed range is 0.5 mph to 12 mph.
K. STOP ButtonÑThis button stops the walking belt.
When the button is pressed, the LED displays will
pause and the TIME display will flash. If the button is
held down for two seconds, the displays will be reset.
L. MODE ButtonÑThis button is used to select the
manual mode and workout programs.
M. START ButtonÑThis button starts the walking belt.
N. LEARN ButtonÑThis button is used to program
speed and incline settings for custom programs.
O. Key with ClipÑThe key turns the console on and off.
The attached clip is designed to be worn on your
waistband. If the key is pulled from the console, the
power will automatically turn off.
P. INCLINE ButtonsÑThese buttons control the incline
of the treadmill. Each time a button is pressed, the
incline will change by 0.5%. The incline range is 0%
to 12%.
Q. INCLINE DisplayÑThis display shows the incline
level of the treadmill. Note: No indicators will light
when the incline is at 0% or 0.5%. The first indicator
will light when the incline is at 1% or 1.5%, the sec-
ond indicator will light when the incline is at 2% or
2.5%, the third indicator will light when the incline is
at 3% or 3.5%, and so on.
R. 7-DAY ButtonÑThis button allows you to view the
number hours you have exercised, the miles you
have walked or run, the calories and fat calories
you have burned, and your average speed for the
previous 7 days (see THE WORKOUT HISTORY
MODE on page 20).
S. TOTAL ButtonÑThis button allows you to view the
total hours you have exercised, the miles you have
walked or run, the calories and fat calories you
have burned, and your average speed since the
workout history mode was last reset.
T. HISTORY RESET buttonÑThis button resets the
workout history mode.