


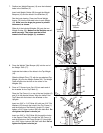
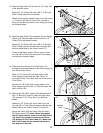

17
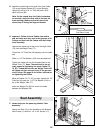
17. Lubricate both axles on the Top Frame (1).
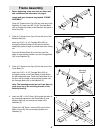
Identify the Right Arm (80) and the Left Arm (81) by
noting the position of the welded bracket (A) on each
Arm. Arm identification is very important for this
step.
Place a Weld Cover (63) on top of the Right Butterfly
Arm (80) in the location shown. Slide the Right
Butterfly Arm onto the right axle. Note: Be careful
not to confuse the Right and Left Arm.
Make sure the upper end of the Right Arm is
behind the indicated bracket (B) on the Top
Frame.
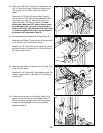
Tap a 3/4Ó Retaining Ring (86) and a 3/4Ó Dome Cap
(75) onto the right axle. To do this, place the
Retaining Ring on top of the inverted Dome Cap and
tap the Cap onto the axle with a rubber mallet.
Make sure the teeth on the Retaining Ring (86)
bend toward the Dome Cap (75), as shown in the
inset drawing.
Attach the Left Butterfly Arm (81) in the same man-
ner.
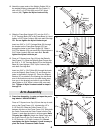
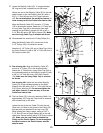
10
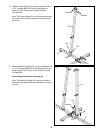
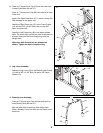
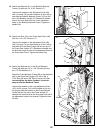
18. Locate and open the parts bag labeled ÒCable
Assembly and Pulleys.Ó For Cable identification
and routing during steps 18Ñ36, refer to the
Cable Diagram and Cable ID Chart on page 19.
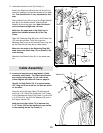
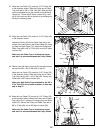
Identify the High Cable (73). It is approximately
163Ó long and it has a ball on one end and a bolt
on the other.
Wrap the end of the High Cable (73) with the ball
around a 3 1/2Ó Pulley (35). Attach the 3 1/2Ó Pulley
to the indicated hole on the Top Frame (1) with a 3/8Ó
x 3 1/2Ó Bolt (54), two 3/8Ó Flat Washers (55) and a
3/8Ó Nylon Jamnut (78).
Make sure the High Cable (73) is between the
3 1/2Ó Pulley (35) and the welded pin (not visible
in the drawing) on the Top Frame (1).
18
75
86
B
1
80
Lubricate
Lubricate
81
63
54
73
1
35
Welded Pin
55
Cable Assembly
55
78
Axle
86
75
A
A