


28
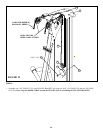
FIGURE 22
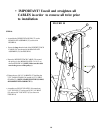
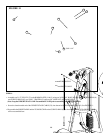
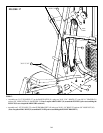
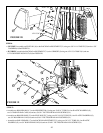
• Adjustments can be made in the above locations to set the correct amount of tension in the cables.
ADJUSTMENT
CABLE USING
JAM NUT
STEP 22:
20
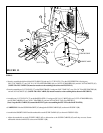
• If upon completion of assembly, the HEAD PLATE (23) does not sit on top of the first WEIGHT PLATE (21), push the HEAD
PLATE (23) down, insert the WEIGHT STACK PIN (27) and perform several repetitions. This will relax the cable system and
prevent the HEAD PLATE (23) from lifting up. See FIGURE 22
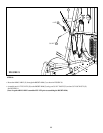
• If after completing the previous step, the HEAD PLATE (23) still does not sit on top of the first WEIGHT PLATE (21) or if
there is excess slack in the cable system, adjust the threaded ends of the CABLES attached to the PULLEY BRACKETS
(9) and (42) accordingly and retighten the jam nuts.See figure 22.
• For maximum performance, the HEAD PLATE (23) should just barely sit on the top WEIGHT PLATE (21).
Thank you for purchasing the ParaBody CM3 Gym System. If unsure of proper use of equipment, call
your local ParaBody distributor or call the ParaBody customer service department at (800) 328-9714
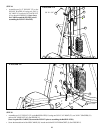
• NOTE: After making adjustments make sure all jam nuts are SECURELY TIGHTENED!
• This completes the assembly of the CM3 Gym System. If the CM3 SHROUD OPTION was purchased refer to the CM3
SHROUD KIT assembly instructions.
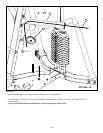
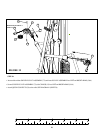
• Adjust the turnbuckle on each GUIDE CABLE (65) to add tension to the GUIDE CABLES (65). Secure turnbuckle with the JAM
NUTS as shown in FIGURE 22.
19
ADJUSTMENT
CABLE USING
JAM NUT
22
73
59
9
65
TURN BUCKLE
ADJUSTMENT
42
23
41
50