


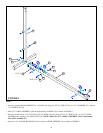

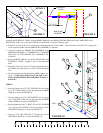

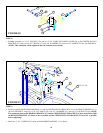
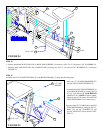
FIGURE 15
12
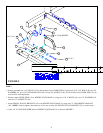
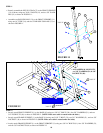
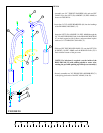
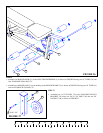
FIGURE 16
STEP 15
• Insert two GUIDE RODS (33) into the WEIGHT
STACK BASE (3) as shown on FIGURE 15.
(NOTE: Lubricate GUIDE RODS (33) with
silicon or teflon spray available at most hard-
ware stores.)
• Slide two WEIGHT STACK SPACERS (34), two
3/4” WASHERS (53), and two WEIGHT STACK
CUSHIONS (88) - IN THAT ORDER - down
over the GUIDE RODS (33).
• Securely assemble the WEIGHT STACK SHAFT
(80) to the HEAD PLATE (81) using one 3/8 X 1-1/
4” BOLT (46) and one 3/8” WASHER (51).
• Using EXTREME CARE slide all fifteen
WEIGHT PLATES (74) down over the GUIDE
RODS (33) on to the WEIGHT STACK CUSH-
IONS (88). Make sure that the keyholes of the
WEIGHT PLATES (74) are all facing the right
way.
• Insert two CAP PLUGS (89) into the top ends of the
GUIDE RODS (33).
• Swing the GUIDE RODS (33) under the TOP
BOOM (7) as shown on FIGURE 16.
• Slide the head plate assembly down over the
GUIDE RODS (33) onto the weight stack.
• Attach the WEIGHT STACK LABELS (94) to the
weight stack. Also insert the WEIGHT STACK
PIN (57) into the first WEIGHT PLATE (74) of
the weight stack.
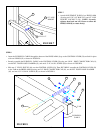
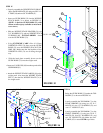
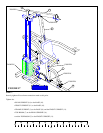
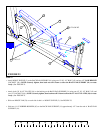
• Loosely assemble the TOP BOOM (7) to the
FRONT UPRIGHT (11) using two 3/8 X 3”
BOLTS (39), four 3/8” WASHERS (51), and
two 3/8” LOCKNUTS (48). Make sure LAT
CABLE (92) is routed OVER top of bolts.
34
3/8 X 1-1/4” 46
53
89
51
80
74
57
33
88
81
3
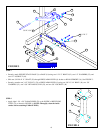
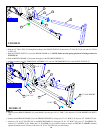
• Loosely assemble the TOP BOOM (7) to the
REAR UPRIGHT (16) using two 1/2 X 4”
BOLTS (44), two 1/2” WASHERS (52), and
one 1/2” LOCKNUT (49).
STEP 16
16
7
48
51
52
44 1/2 X 4”
51
11
49
39 3/8 X 3”
Route LAT
CABLE over bolts
92
33