


16
Section 2: Tractor Hook-up & Unhook
SBD3596 & SBD35108 Snow Blowers 370-347M
12/15/15
Table of Contents
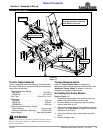
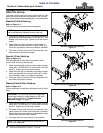
Leveling The Snow Blower
Refer to Figure 2-5 on page 15:
1. Manually adjust one of the lower lift arms up or down
to level the Snow Blower from left to right.
2. Manually adjust length of top-center-link to level the
Snow Blower from front to back.
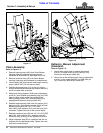
Driveline Installation
!
DANGER
Do not engage tractor PTO while hooking-up and unhooking
driveline or while someone is standing near the driveline. A
person’s body and/or clothing can become entangled in the
driveline resulting in serious injury or death.
!
DANGER
All guards must be installed and in good condition at all times
during operation.
!
WARNING
Do not use a PTO adapter. A PTO adapter will increase strain
on the tractor’s PTO shaft resulting in possible damage to
shaft and driveline. It will also defeat the purpose of the
tractor’s master shield and could cause bodily injury or death.
!
WARNING
Always disengage PTO, engage parking brake, shut tractor
engine off, remove switch key, and wait for PTO to come to a
complete stop before dismounting from tractor.
!
CAUTION
Some tractors are equipped with multispeed PTO ranges. Be
certain your tractor’s PTO is set for the correct speed:
• SBD Series are designed for 540 rpm rear PTO.
• SBDM Series are designed for 1000 rpm rear PTO.
IMPORTANT: Do not use a PTO adapter. A PTO
adapter will increase strain on the tractor’s PTO
shaft resulting in possible damage to shaft and
driveline.
IMPORTANT: An additional driveline may be
required if Snow Blower is to be used on more than
one tractor, especially if a Quick Hitch is used.
IMPORTANT: The driveline must be lubricated
before putting it into service. Refer to “Lubrication”
on page 35.
IMPORTANT: The tractor’s PTO shaft and Snow
Blower gearbox shaft must be aligned and level with
each other during installation of driveline.
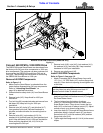
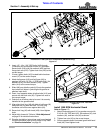
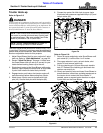
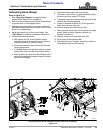
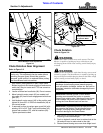
Driveline Installation
(Standard 3-Point Hitch Hook-up Shown)
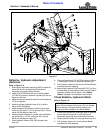
Figure 2-7
Refer to Figure 2-7:
1. Park tractor on a level surface. Slowly engage tractor
3-point lift lever to raise Snow Blower until gearbox
input shaft is in line and level with tractor PTO shaft.
2. Place gear selector in park, set park brake, shut
tractor off, and remove switch key.
3. Support Snow Blower at this height with support
jacks or blocks to keep unit from drifting down.
4. Unscrew knob (#10) on PTO bell ring (#3).
5. Turn bell ring (#3) counterclockwise and remove from
bell base (#4).
6. Remove driveline bolts (#15) at the splined end of the
shear bolt clutch.
7. Slide driveline yoke onto the gearbox input shaft until
holes in yoke align with groove in gearbox shaft.
8. Insert, from opposite sides, driveline bolts (#15) and
secure with hex lock nuts (#5). Tighten lock nuts to
the correct torque.
9. Push/pull on driveline yoke to ensure it is securely
fastened to the gearbox shaft.
10. Align slots in bell ring (#3) with bolts in bell base (#4)
and push bell ring onto the bolts. Turn bell ring
clockwise until slots come against bolts on the bell
base (#4).
11. Secure bell ring (#3) with knob (#10). Hand tighten
knob.
35742
IMPORTANT: Do not shorten driveline. Extend
Snow Blower 3-point hitch or add a quick hitch to
your tractor if driveline is too long to attach to your
tractor with gearbox shaft and PTO shaft in
alignment and level with each other. Refer to “Hitch
Adjustment” on page 22 for instructions on how to
extend the Snow Blower 3-point hitch.