


12
Section 1: Assembly & Set-up
SBD3596 & SBD35108 Snow Blowers 370-347M
12/15/15
Table of Contents
Convert 540 RPM to 1000 RPM Drive
The SBD35108 model Snow Blower can be ordered from
the factory with 540 rpm drive components or 1000 rpm
drive components. The customer can also purchase a kit
for converting the SBD35108 model from 540 rpm to
1000 rpm. The following are instructions for converting
the SBD35108 Snow Blower to 1000 rpm.
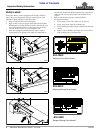
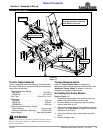
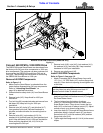
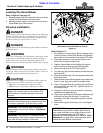
Remove 540 RPM Components
Refer to Figure 1-5:
1. Make sure the Snow Blower is unhooked from the
tractor before disassembling 540 rpm components.
Refer to “Unhooking Snow Blower” on
page 19 for detailed instructions.
2. Unhook driveline safety chain (#1) from Snow Blower
frame.
3. Remove knob (#15). Keep Knob for 1000 rpm
installation.
4. Turn bell ring (#6) counterclockwise and remove from
bell base (#4). Keep bell ring for 1000 rpm
installation.
5. Remove nuts (#2), bolts (#7), and driveline (#17)
from gearbox input shaft. Reinstall hardware in
driveline and store driveline for converting back to
540 rpm.
6. Remove bolts (#9), lock washers (#13), flat
washers (#14), and bell base (#4) from gearbox input
shaft. Keep bell base (#4) for 1000 rpm installation.
Store mounting hardware (#9, #13, & #14) for
coverting back to 540 rpm
7. Remove knob (#16), nuts (#10), lock washers (#11),
flat washers (#12), and bolts (#8). Keep removed
hardware for 1000 rpm installation.
8. Remove rear shaft guard (#5).
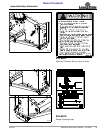
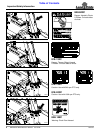
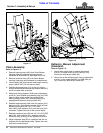
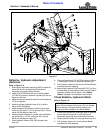
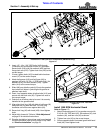
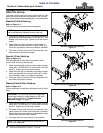
Install 1000 RPM Components
Refer to Figure 1-6 on page 13:
1. Attach L-brackets (#8) to Snow Blower frame with
1/2"-13 x 1 1/2" GR5 bolts (#17) and hex flange lock
nuts (#1). Draw lock nuts up snug, do not tighten nuts
at this time.
2. Slide hollow splined shaft of chain reducer (#5) over
gearbox input shaft until reducer mount (#7) is against
the Snow Blower frame.
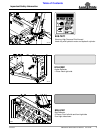
3. The four holes along the bottom of reducer
mount (#7) should align with the four holes in the
Snow Blower frame. If they do not, loosen the four
bolts (#15) on the back of reducer mount (#7). Adjust
reducer mount up or down to align holes.
4. Insert four bolts (#17) through the Snow Blower frame
and bottom holes in reducer mount (#7) as shown.
Secure bolts (#17) with flat washers (#2A) and hex
flange lock nuts (#1A).
5. Tighten eight hex flange nuts (#1 & #1A) to the correct
torque.
NOTE: Chain reducer (#5) and reducer mount plate
can be picked up using the large oval slots “A”
located on both sides of reducer mount.
Removal of 540 RPM Components (SBD35108 Only)
Figure 1-5
37320